Requesting DHCP for Networks

Terminology

This page uses “autoconfiguration” as a generic term (more general than DHCP) for empowering end hosts on your network to automatically configure themselves with an IP address and other network configuration parameters.

Requesting Autoconfiguration Service

To enable autoconfiguration for your existing network, email net-trouble@illinois.edu with the following information:

  • The name and IP CIDR of the network
  • Which type of autoconfiguration you would like to enable (see below for details)
  • If the network already has a DHCP server, let us know and provide details so that we can assist you in migrating your existing DHCP configuration into IPAM.
  • Optionally, any other special configuration changes you require at this time (e.g. DHCP options set at the network level)

Sample requests:

“Please enable DHCPv4 for uiuc-example-net 192.0.2.0/24”

“Please enable IPv6 Stateless autoconfiguration for uiuc-example-net 2001:db8:abcd::/64”

“Please enable IPv6 Stateful autoconfiguration for uiuc-example-net 2001:db8:abcd::/64”

“I would like to migrate uiuc-example-net 192.0.2.0/24 to campus DHCP from an existing local DHCP server.  (details)”

Please note: merely enabling DHCPv4 or IPv6 Stateful autoconfiguration is not sufficient to allow your DHCP clients to obtain leases!  You must also use IPAM to configure DHCP for your network.  Read on for more information.  (IPv6 Stateless autoconfiguration is different, and does not require you to configure anything in IPAM)

For new networks, work with your network designer to request autoconfiguration service as part of the network creation process.

Autoconfiguration Design Guide

There is no one-size-fits-all optimal approach to autoconfiguration; which type you choose, and which DHCP objects you configure in IPAM, will vary depending on how you want to use and administer your network.

The first step is to determine which of the following client behaviors you want to support:

  • dynamic address allocation: each client automatically obtains an available IP address which is arbitrary and unpredictable. It doesn’t matter which client gets which IP, or if a particular client gets a different IP next time it comes back. This behavior is the easiest to configure, and requires very little administrative maintenance once set up.
  • fixed address allocation: each client automatically obtains an IP address which has been administratively reserved for that client’s exclusive use.  This behavior requires more configuration work in IPAM (new clients must be added and old ones removed), but allows individual client IPs to be stable and predictable.
  • manual client configuration: each client device is manually configured with the necessary network parameters, and does not use autoconfiguration at all. This is usually only necessary for devices which do not support autoconfiguration.

It is possible to mix and match, using different behaviors for different clients on the same network, but care must be taken to avoid conflicts!

In particular, if your network includes any manually-configured devices, it is very important that DHCP not be configured to hand out those IP addresses to other clients!

Next, select the autoconfiguration type that best supports your desired behavior(s) – these are covered in detail in the following sections – and request that type of autoconfiguration service on your network.

Finally, if you’ve chosen DHCPv4 and/or IPv6 Stateful autoconfiguration, configure the desired DHCP objects in IPAM (see Using IPAM for detailed instructions):

  • DHCP Ranges (Dynamic Pools) for dynamic address allocation
  • DHCP-enabled Host Records and/or DHCP Fixed Addresses for fixed address allocation

    Notes for Microsoft DHCP users

    A Microsoft DHCP “Reservation” corresponds to a “Fixed Address” in IPAM. Avoid the temptation to create a “Reservation” in IPAM; that term refers to a different concept entirely and will not accomplish what you intend.

    Also, there is no need to place Fixed Addresses inside a DHCP Range (a “scope” in Microsoft terms); in fact, it’s best practice to avoid doing this. If you don’t want to use dynamic address allocation behavior on your network, you should not create a DHCP Range at all.

IPv4 Autoconfiguration Types

For IPv4, autoconfiguration is synonymous with DHCPv4, so the standard choices are simple; DHCPv4 is either enabled or disabled for any given network.

No Autoconfiguration DHCPv4
dynamic address allocation?
fixed address allocation?
manual client configuration? ✅ note: manually configured clients may need to explicitly disable autoconfiguration.
Technical Details Router: no ip helper

IPAM: network disabled

Router: ip helper pointing to campus DHCP servers

IPAM: network enabled, with Fixed Addresses / Hosts (for fixed allocation behavior) and/or Ranges (for dynamic allocation behavior)

Notes:

  • Several best practice recommendations are discussed in DHCP Ranges (Dynamic Pools).
  • One strategy for preserving flexibility on a mixed-behavior net is to create a DHCP Range near the end of the net (i.e. highest-numbered IPs), and allocate Fixed Addresses, DHCP-enabled Hosts, and static IPs for manual configuration (if any) starting from the beginning of the net (lowest-numbered IPs).

IPv6 Autoconfiguration Types

For IPv6, there are multiple standard implementation choices for autoconfiguration, each supporting different behavior(s):

No Autoconfiguration Stateless Stateful
dynamic address allocation? ✅ preferred ⚠️ less efficient, redundancy is not automatic (see technical details)
fixed address allocation? ✅ yes, but see Limitations
manual client configuration? ✅ note: manually configured clients may need to explicitly disable autoconfiguration. ✅ note: manually configured clients may need to explicitly disable autoconfiguration.
Suggested Use Cases non-routed nets carrying only link-local traffic

other special cases

typical end-user nets (dynamic) wherever fixed address allocation behavior is required
What Happens Client self-configures one or more arbitrary IPv6 addresses, and sends a DHCPv6 Information-Request to obtain option values (including the IPv6 DNS resolver address).

Clients lacking DHCPv6 support can still obtain an address, but will not obtain option values.

Client uses DHCPv6 to obtain both an IPv6 address and option values (including the IPv6 DNS resolver address).

Dynamic vs fixed allocation is determined by IPAM configuration.

Clients lacking DHCPv6 support must be configured manually.

Technical Details Router: A=0, M=0, O=0, no DHCPv6 relay

IPAM: network disabled

More precisely “SLAAC + stateless DHCPv6”

Router: A=1, M=0, O=1, DHCPv6 relay pointing to campus DHCP servers

IPAM: network enabled, but no Ranges or Fixed Addresses / Hosts

Router: A=0, M=1, O=0, DHCPv6 relay pointing to campus DHCP servers

IPAM: network enabled, with Fixed Addresses / Hosts (for fixed allocation behavior) and/or Ranges (for dynamic allocation behavior)

Notes:

  • Where feasible, choose Stateless over Stateful autoconfiguration for your IPv6 networks.
    • Stateless is simpler than Stateful, and significantly easier on the DHCP servers.
    • If your network includes clients without DHCPv6 support, they will still be able to obtain an IPv6 address using Stateless autoconfiguration. Such clients will not learn the IPv6 DNS resolver address or other option values, but in many cases clients can function successfully without this information (e.g. by using IPv4 for DNS resolution, if available).
    • It is easy to migrate between Stateless and Stateful in the future if your requirements change.
  • Most modern clients do support DHCPv6, as shown in https://en.wikipedia.org/wiki/Comparison_of_IPv6_support_in_operating_systems.

Technical Details

  • A, M, and O refer to the “Autonomous address configuration”, “Managed address configuration”, and “Other configuration” flags in the Router Advertisement, defined in RFC 4861.
  • The “Stateless” option shown above is more precisely described as “SLAAC + stateless DHCPv6” (SLAAC is the common abbreviation for IPv6 Stateless Address Autoconfiguration, as defined in RFC 4862).  Other stateless options are technically possible, but are not listed in the chart because we anticipate that they would rarely offer any practical advantage.
    • In particular, RDNSS (the “Recursive DNS Server” Router Advertisement option defined in RFC 6106) offers another way to provide clients with the IPv6 DNS resolver address, but DHCPv6 provides more general functionality, and most clients which support RDNSS also support DHCPv6.
  • The DHCPv6 Failover Protocol (to automatically provide redundancy for dynamic autoconfiguration using DHCPv6) defined in RFC 8156 is not currently supported by IPAM, so the only way to achieve dynamic allocation redundancy with Stateful autoconfiguration is to manually configure two separate non-overlapping Ranges in IPAM, one served by each DHCP server.

Limitations of DHCPv6 fixed address allocation

The DHCPv4 protocol specification (RFC 2131) includes a “client hardware address” (chaddr) field which in practice contains the MAC address of the requesting client’s network interface.  This makes it easy for a DHCPv4 server to identify clients by MAC, and to assign fixed address allocations based on the client’s MAC.

The DHCPv6 protocol specification (RFC 3315) does not include a client hardware address field; instead, it defines the DHCP Unique Identifier (DUID) which is intended as an opaque, globally unique, and stable identifier for the whole client device (not just for one of its network interfaces).  Because the MAC address is not included in DHCPv6 messages, there was originally no way for a DHCPv6 server to assign fixed address allocations based on the client’s MAC address; instead, you must configure them based on the client’s DUID.

The challenge is that it can be difficult or impossible to learn the client’s DUID ahead of time.  While the MAC address is a property of the physical hardware, the DUID (for most general-purpose computers, at least) is a software property generated and stored on disk by the operating system.  Depending on your operating system, the DUID may not even exist until it is needed for the first time – and it will almost certainly change if you reinstall the operating system, dual-boot to a second operating system, etc.

More recently, RFC 6939 provides a mechanism for the router (acting as relay agent) to provide the client’s MAC address so that DHCPv6 servers can use it to assign fixed address allocations.  However, as of this writing (April 2025) this option is not yet supported by most building routers on our campus.

Recommendations:

  • Where possible, sidestep this issue entirely by using dynamic address allocation instead of fixed.
  • If you do require fixed address allocation, make sure you understand the challenges discussed in this section and that you have a strategy for ascertaining client DUIDs.

Other Information

DHCP Standards details important guidelines and recommendations for using the DHCP service, as well as the default configuration parameters that will automatically apply to all networks unless you choose to override them.

Email Alerts explains the automated email notifications that may be sent to network administrators by the DHCP service.

Using the IPAM API

This page contains information about configuring and using the Grid Manager API (application programming interface).

Introduction

IPAM Grid Manager includes a RESTful Web API (WAPI).  The purpose of this page is to help you get started using WAPI, and to make you aware of some important considerations that are specific to the University of Illinois IPAM service.  Please refer to the vendor documentation for a comprehensive API reference.

WAPI vendor documentation is available from https://ipam.illinois.edu/wapidoc/ or published in PDF format.

The current WAPI version is 2.12.3. New client programs should be written to use this version.

Previous WAPI versions still supported include: 1.4.2, 2.2.2, 2.7.3, 2.11.1

API Credentials

All IPAM users (see How do I gain access to IPAM?) also have access to the API.  You must authenticate using your full Active Directory userPrincipalName (typically yournetid@illinois.edu or serviceuser@ad.uillinois.edu, but other variations are also possible).

Using your own credentials is appropriate for direct, interactive use of the API (e.g. command-line utilities) where you can supply your Active Directory password and Multi-Factor Authentication (MFA) at run time.  IPAM is not able to prompt you interactively for a second authentication factor, but you can append a passcode or factor name to your password as documented in https://guide.duo.com/append-mode.

If you don’t append anything to your password, you should automatically receive a push notification (if you have a smartphone registered for Duo).

If you have more than one smartphone registered for Duo, you might need to append e.g. “,push2” to use your second device.

If your actual password happens to contain any commas (the delimiter character for append mode), we suggest always appending something (e.g. “,push”) so that your authentication can succeed on the first try without requiring an extra round-trip to AD on the back end.

If your application requires unattended access to the IPAM API, you will need to create and authorize a non-person service user:

  1. Create an Active Directory user object under your own organizational unit (OU) with a strong, randomly generated password.  We suggest choosing a name longer than 8 characters that begins with your unit or group followed by a dash (e.g. “techsvc-foo”) for easy identification and to avoid conflicting with potential NetIDs; see also Active Directory Naming Conventions.
  2. Use Contacts Database to grant the desired permissions to your service user (either directly or via an AD group).

    Note that Contacts Database identifies users by their Active Directory sAMAccountName, a.k.a. “User logon name (Pre-Windows 2000)”, which is different from the userPrincipalName you will use to authenticate to the IPAM API.
  3. Non-person service users must be individually exempted from MFA for IPAM by the IPAM service managers.  Contact hostmgr with the Active Directory userPrincipalName of your service user to request this.
  4. Verify that you can successfully authenticate to the IPAM API with the Active Directory userPrincipalName of your service user.  If the actual password happens to contain any commas, we suggest appending “,push” as a placeholder so that authentication can succeed on the first try.

Rules of Use

  1. Contrary to some of the vendor-provided examples,
    • Always use a hostname (i.e. “ipam.illinois.edu” for production) in the WAPI request URL. Do not use an IP address.

      It is possible that the IP address of the grid master may change from time to time, but the hostname ipam.illinois.edu will always resolve to the current grid master’s IP.

    • DO NOT disable SSL/TLS validation e.g. by passing the “-k” option to curl.
  2. Use the “ibapauth” cookie (see Transport and Authentication) when making multiple API requests in the same program invocation, so that IPAM will not have to recheck your credentials (and MFA) for every single request.
  3. Keep in mind that the grid master has finite computational resources, and be responsible and considerate in your usage. Do not (for example) write a script that performs lots of intensive API operations and schedule it to run automatically every few minutes.

    If you need to write a recurring API job that could significantly impact the grid master, please talk to us first. We don’t want to have to revoke access to the API.

  4. Read and understand Backward Compatibility, and plan your deployments accordingly.

    Best practice: obtain the full WAPI base URL including version (e.g. https://ipam.illinois.edu/wapi/v2.12.3) from one or more configuration parameters rather than hardcoding it directly into your program.

Quick Start

Try a few simple GET requests from the command line using curl:

  • Retrieve the singleton Grid object (a simple test to make sure your credentials work):
    curl --user yournetid@illinois.edu -X GET 'https://ipam.illinois.edu/wapi/v2.12.3/grid'
  • Again, but also save the returned “ibapauth” cookie to a temporary cookie jar file, and use it to make a subsequent request without having to supply credentials:
    COOKIE_JAR=$(mktemp)
    
    curl --user yournetid@illinois.edu -c ${COOKIE_JAR:?} -X GET 'https://ipam.illinois.edu/wapi/v2.12.3/grid'
    
    curl -b ${COOKIE_JAR:?} -X GET 'https://ipam.illinois.edu/wapi/v2.12.3/grid'
    
    rm ${COOKIE_JAR:?}

    Be sure to consider the security implications of storing the cookie in a file!  Real applications should store it in memory instead (where it cannot be read by other processes).

  • List all IPv4 Networks you have permission to see:
    curl --user yournetid@illinois.edu -X GET 'https://ipam.illinois.edu/wapi/v2.12.3/network'
  • Again, but include Extensible Attributes (such as Network Name) in the returned data, and limit the result set to 2 objects:
    curl --user yournetid@illinois.edu -X GET \
    'https://ipam.illinois.edu/wapi/v2.12.3/network?_return_fields=network,extattrs&_max_results=2'
  • Again, but use paging to iterate through the entire result set, retrieving 2 objects at a time.

    This is a simple example for demonstration purposes.  In practice, results paging is only necessary when your search might return too many objects to retrieve all at once (e.g. > 1000), and you should use a page size on the order of 500 or 1000.

    Initial request:

    curl --user yournetid@illinois.edu -X GET \
    'https://ipam.illinois.edu/wapi/v2.12.3/network?_return_fields=network,extattrs&_max_results=2&_paging=1&_return_as_object=1'

    Subsequent requests:

    curl --user yournetid@illinois.edu -X GET \
    'https://ipam.illinois.edu/wapi/v2.12.3/network?_page_id=789c5590...9c96b659'

    where each new request’s `_page_id` is the value of `next_page_id` returned by the previous request.

The documentation includes sample curl requests for PUT, POST, and DELETE (Examples accessing WAPI using Curl), but many of these examples require permissions that are not given to non-superusers in our environment (e.g. creating Networks).  Try adapting them to other object types, such as a stand-alone A record:

Note: URLs in the following examples are written to use the development IPAM system, a good idea when experimenting with new features you haven’t used before.

  • Use POST to create a new stand-alone A record:
    curl --user yournetid@illinois.edu -X POST 'https://dev.ipam.illinois.edu/wapi/v2.12.3/record:a' \
    -H "Content-Type: application/json" \
    --data '{ "name": "mytestrecord.sandbox.illinois.edu", "ipv4addr": "192.168.0.5", "comment": "WAPI is fun" }'
  • Search for the record we just created, and note its object reference (“_ref“) in the output:
    curl --user yournetid@illinois.edu -X GET 'https://dev.ipam.illinois.edu/wapi/v2.12.3/record:a?name=mytestrecord.sandbox.illinois.edu'
  • Use PUT to modify the ipv4addr field of the existing record (using the object reference obtained above):
    curl --user yournetid@illinois.edu -X PUT 'https://dev.ipam.illinois.edu/wapi/v2.12.3/record:a/ZG5zLmJp...LjAuMC41' \
    -H "Content-Type: application/json" \
    --data '{ "ipv4addr": "192.168.0.6" }'

Resources

The Infoblox Community site has an article on Getting Started with the Infoblox Web API (WAPI) which you may find helpful, as well as a long list of REST examples (user-contributed) and other searchable content.

Perl

Here are a helper module and a working example script that you can use as a basis for your own programs.  Set environment variable IPAM_WAPI to the desired WAPI base URL (including version) before running the script.

  • IPAMUserAgent.pm
    Helper module for IPAM WAPI scripts written in Perl.
    Requires LWP::UserAgent, optionally uses Config::Simple
  • add_host_ip.pl
    Uses GET, POST, and PUT requests to either create a new Host record or add an IP to an existing Host record.
    Requires IPAMUserAgent.pm (above), JSON, and NetAddr::IP.

Python

Here are a helper module and a working example script that you can use as a basis for your own programs.  Set environment variable IPAM_WAPI to the desired WAPI base URL (including version) before running the script.

Ansible

Ansible provides official Infoblox NIOS modules for many common use cases.  Here are a helper playbook and some working example playbooks to get you started; note that these playbooks take extra care to avoid unexpectedly overwriting or deleting an existing record.

Requires infoblox-client (https://infoblox-client.readthedocs.io/)

Deprecated Perl-only API (PAPI)

You may encounter occasional references to a legacy Perl-only API (PAPI) which predated the modern RESTful Web API (WAPI), worked only with Perl, and required specific Infoblox perl modules to be installed on every client system and upgraded in lockstep with the appliance grid.  Use of PAPI at the University of Illinois has been strongly discouraged for many years, and it is now officially deprecated by the vendor as well.  Our only reason for mentioning it here is to forestall confusion in case you encounter the term and wonder what it means.

Advanced Tips and Tricks

This page contains some additional tips to help you use Grid Manager more efficiently. These tips will be most helpful to users who have already logged in once or twice and familiarized themselves with the basics.

Bookmarks

Grid Manager allows you to bookmark an object (zone, network, etc) and easily navigate back to it later. This is a good way to quickly access your most commonly used objects.

Adding bookmarks:

  1. Open the object you wish to bookmark, so its name or identifier is displayed near the top of the main window (see Getting Started with IPAM).
  2. Click the Bookmark (red swallowtail flag) icon to add a new bookmark for this object.

    screenshot

Using bookmarks:

  1. Locate the Finder panel on the far left-hand side of the window; if it is currently collapsed, click the gray folder icon to expand it.
  2. Expand the “Bookmarks” subpanel.

    screenshot

  3. Click on the name of a bookmark to immediately navigate to the object.

You can also hover over a bookmark and click the Edit (blue pencil) icon to change its name, or the Delete (trash can) icon to delete it.

Smart Folders

The following smart folders can provide you with quick, convenient access to your own domains and networks (the ones for which you are listed in Contacts Database), but they require a one-time set up for each user account.

Setting up the My Domains smart folder

  1. Navigate to Smart Folders > Global Smart Folders using the rows of tabs at the top of the screen.
  2. Select the global smart folder named “My Domains”.
  3. Click “Save Copy As” to create your own personal copy of this smart folder named “My Domains Copy” under Smart Folders > My Smart Folders.

    screenshot

  4. Click the Edit (blue pencil) icon to edit “My Domains Copy”.
  5. In the last filter criterion (CDB Permission equals NETID), replace “NETID” by your netid.
  6. Click the “Save” button (not “Save Copy As”) to save your changes.

    screenshot

Setting up the My Networks smart folder

  1. Navigate to Smart Folders > Global Smart Folders using the rows of tabs at the top of the screen.
  2. Select the global smart folder named “My Networks”.
  3. Click “Save Copy As” to create your own personal copy of this smart folder named “My Networks Copy” under Smart Folders > My Smart Folders.
  4. Click the Edit (blue pencil) icon to edit “My Networks Copy”.
  5. In the last filter criterion (CDB Permission equals NETID), replace “NETID” by your netid.
  6. Click the “Save” button (not “Save Copy As”) to save your changes.

Using Smart Folders

  1. Locate the Finder panel on the far left-hand side of the window; if it is currently collapsed, click the gray folder icon to expand it.
  2. Expand the “Smart Folders” subpanel.
  3. Click the (+) icon to the left of a smart folder (e.g. My Domains or My Networks) to expand its contents within the Finder panel.
  4. For smart folders with grouped results (e.g. My Networks), click the (+) icon to the left of a result group (e.g. network name) to show the individual objects (e.g. network CIDRs).

    screenshot

  5. Click on a domain name or a network CIDR to navigate directly to the corresponding Zone or Network object.

Using the Toolbar panel

The Toolbar panel on the right-hand side of the main window (just to the left of the Help panel) provides many convenient shortcuts for the experienced IPAM user.

For example, you can use the Toolbar’s Add menu to create DNS Records, DHCP Ranges, and even MAC Address Filter Items (MAC addresses within a MAC Address Filter) without having to first navigate to and open a particular Zone, Network, or MAC Filter object. If you know exactly what you want to add and where you want to put it, this can save a lot of clicks.

The Toolbar panel is available in most screens of the Grid Manager interface, but displays different choices depending on navigational context (e.g. which tabs are selected at the top of the window).  If it is currently collapsed, click the gray toolbox icon to expand it.

User Profile

To open the User Profile dialog box, click the drop-down control labeled with your username in the upper right-hand corner of the interface, and select “Profile”.

  • You can customize Table Size to increase the number of rows you see at a time in Grid Manager tables (up to 256).

    Be aware that increasing the table size may result in slower UI performance; you may wish to experiment with different values to find a good balance. The default is 20.

  • You can enter an Email Address which Grid Manager will use e.g. to send you an email when one of your Scheduled Tasks completes.
  • You can choose a Time Zone (e.g. “America/Chicago”) for displaying various time values in Grid Manager, including your own Last Login time at the upper-right corner of this User Profile dialog (reopen the dialog to see the effect of this setting).  The default is “Auto-detect time zone”, but in our experience that setting often ends up falling back to UTC.

Customizing Table Columns

Most tables in Grid Manager can be easily customized to display additional columns. For example, to add the Network Name column to the table that appears when browsing a list of Networks in DHCP View:

  1. Mouse over any currently displayed column header (e.g. “Network”), and click the downward arrow button that appears on its right side.
  2. Choose Columns > Edit Columns from the context menu.

    screenshot

  3. Select the “Visible” checkbox for all desired columns (e.g. Network Name).
  4. Click the “Apply” button.

You can also change the order and width of columns in a table by dragging the column headers with your mouse.  Note that you may have to scroll in order to see all visible columns.

Additional columns you may find useful:

  • Network Name (when displaying a list of Networks in DHCP View or IPAM View)
  • MAC Address (when displaying the contents of a Network or Range)
  • Property Tag (when displaying the contents of a Network or MAC Address Filter)
  • TTL (when displaying Records in a Zone)

Scheduled Tasks

If you don’t want your changes to take effect immediately, you can schedule them to occur later at a time of your choosing.  Important things to keep in mind:

  • While a scheduled task is pending, no further changes can be made to the target object (by you or anyone else) until the task either completes or is cancelled.
  • You can manage your own scheduled tasks, but you cannot manage scheduled tasks owned by another user.
  • Always double check the Time Zone when choosing a time.

Please be considerate of colleagues who manage the same networks and domains you do; avoid e.g. creating scheduled tasks just before you leave on vacation.

If you do find that a change you need to make is obstructed by a pending scheduled task, and you can’t get in touch with the task’s owner, you may contact hostmgr for assistance.

When adding a new object:

  1. Use “Next” to keep advancing through the dialog screens until you reach a choice between “Now” and “Later” (or click “Schedule for Later” to skip ahead to this screen).
  2. Choose “Later”, double-check the Time Zone, and enter the desired date and time.
  3. When you click “Save & Close”, your change will be scheduled for the selected time.

When editing an existing object:

  1. Click the blue calendar icon  at the top right-hand corner of the dialog window to show scheduling options.
  2. Choose “Later”, double-check the Time Zone, and enter the desired date and time.
  3. Optionally, you may collapse the scheduling options again (the calendar icon will turn green as a visual reminder).
  4. When you click “Save & Close”, your change will be saved and scheduled for the time you selected.

When deleting an existing object:

  1. Select the object in any table view (making sure no additional checkboxes are selected).
  2. Click the drop-down arrow next to the Delete (trash can) icon above the table, and choose “Schedule Delete” from the context menu.
  3. In the dialog box, choose “Delete Later”, double-check the Time Zone, enter the desired date and time, and click “Schedule Deletion”.

To manage your own scheduled tasks:

  1. Navigate to Administration > Workflow > Task Manager using the rows of tabs at the top of the screen.
  2. Your current scheduled tasks will be displayed with an Execution Status of “Pending”.
  3. From here you can:
    • Mouse over the various fields for a pending task to show details of the change.
    • Optionally click “Toggle multi-line view” (above the table) to see more without using mouseover.  After you click it, the link text changes to “Toggle single-line view”.
    • Select a pending task and “Execute Now”.
    • Select a pending task and Reschedule it for a different time.
    • Select a pending task and Delete it.

Extensible Attributes

Grid Manager supports the definition of custom fields called Extensible Attributes to store additional data which is not natively part of an object type. Technology Services has created a few Extensible Attributes that you may find useful:

  • Property Tag: Can be used to store a University property tag value for inventoried items
  • Comment+: The built-in comment field for Grid Manager objects is limited to 256 characters. If you want to store additional comments, you can use this attribute to do so.

You can set these attributes on the Extensible Attributes subscreen, while creating a new object or editing an existing one:

  1. Click the Add (+) icon above the Extensible Attributes table to place a new row in the table.
  2. Click the Attribute Name field in that row to choose the desired attribute.
  3. Click the Value field in that row and type the desired value.
  4. Some extensible attributes (e.g. “Comment+”) can have multiple values for the same object; use the “+” icon to the left of the attribute name to add another value.

    screenshot

If you have a request for a new Extensible Attribute that is not already defined, please contact hostmgr.  Keep in mind that Extensible Attribute definitions are global, so they should be potentially relevant (or at the very least, not confusing) to the entire IT Pro community.

Recycle Bin

If you delete an item by accident, you may be able to restore it using the Recycle Bin.

To view items in your Recycle Bin:

  1. Locate the Finder panel on the far left-hand side of the window; if it is currently collapsed, click the gray folder icon to expand it.
  2. Expand the “Recycle Bin” subpanel.

    screenshot

  3. To restore a deleted item, hover over the item in your list and click the “Restore” (circular arrow) icon.

    Grid Manager does not display a confirmation dialog before restoring an object from the Recycle Bin!

    It also does not show you the newly restored object; if you want to examine it, you must navigate to it on your own.

    You can also click “Show All” to display a table showing slightly more information about each deleted item (including the Parent/Container where it will be found if you choose to restore it).

CSV Import and Export

Most tables in Grid Manager have an Export (up arrow) button which you can use to download the contents of the table in CSV format.  This can be very helpful if you want to sort or filter your data in a way that the Grid Manager interface doesn’t support.

You can also import records into Grid Manager from a .csv file.

See CSV Imports and Exports for details.

DNS Traffic Control

Introduction

DNS Traffic Control (DTC) enables the IPAM authoritative nameservers to dynamically adjust their query responses for a particular domain name and record type, potentially returning a different address (A or AAAA) record each time depending on:

  • health checks
  • the source IP address of the query (note that this source IP usually belongs to the recursive DNS resolver rather than the end user)

    RFC7871 defines an EDNS0 Client Subnet option for recursive DNS resolvers to tell the authoritative nameserver about the originating client’s IP, but many recursive DNS resolvers do not implement this option (in part due to some privacy shortcomings).

DNS Traffic Control can be used to provide active/passive failover or active/active load distribution (not true load balancing, see below) between multiple target IP addresses for the same service.  The target IP addresses must be stable and known in advance.

The query response synthesized by DNS Traffic Control is returned instead of any normal DNS resource records which may be configured in IPAM for the queried domain name and type.  However, if DTC is not able to synthesize a response (e.g. because none of the eligible target IPs appear to be healthy), then the normal DNS resource record set is returned as a fallback.

Known Issue: DNS Traffic Control may return your fallback records (instead of synthesized responses) for about 1 second after a restart of services in which other DTC configuration changes are being applied, even if those changes have nothing to do with your LBDN.  Mitigation: choose good fallback records!

Responses for other record types, such as TXT, are completely unaffected by DNS Traffic Control.

Example

The following illustration shows a DTC Load-Balanced Domain Name (LBDN) with two DTC Pools comprising a total of three DTC Servers.

The domain name (e.g. example.illinois.edu) is associated with the LBDN; the target IP addresses are associated with the DTC Servers.

This LBDN uses the “Global Availability” load balancing method to always prefer test-pool1 over test-pool2.

Each Pool uses the “Ratio: Fixed” load balancing method to randomly select from among the available Servers in that Pool.

With this configuration, A record queries matching the LBDN will return:

  1. one A record for the IP address of either test-server1 or test-server2 (choosing randomly each time if both are healthy).

    Right now test-server2 is unhealthy, so every matching A record query will return an A record for the IP of test-server1.

  2. one A record for the IP address of test-server3, if both test-pool1 servers are down but test-server3 is healthy.
  3. the normal (non-DTC, fallback) set of A records configured in IPAM for the queried domain name, if all three servers (and therefore both pools) are down.

Using multiple Pools makes it possible to implement fairly sophisticated logic, but this is not always necessary; many real-world use cases require only a single Pool (which can be either active/passive or active/active depending on the load balancing method chosen).

For introductory purposes this example shows only DTC Servers with IPv4 addresses, but we can add more DTC Servers with IPv6 addresses to get equivalent behavior for AAAA record queries as well (using the same Pools and LBDN).  Note that DNS Traffic Control automatically ignores DTC A records while synthesizing an AAAA response, and vice versa.

About TTLs

The scalability of DNS depends upon caching DNS records in accordance with their TTL (time-to-live) values.  The effectiveness of DNS Traffic Control as a failover mechanism depends upon using very short TTL values, typically 60 seconds or less, to limit the cache lifetime of its synthesized query responses.  It also depends on client applications issuing a new DNS query before reconnecting to your service, instead of just retrying against the same remembered IP address.  Note as a consequence that DNS Traffic Control is generally much more effective at mitigating protracted outages than brief intermittent outages.

TTL Caveat

So far, we have not found the following to be a significant problem in practice, but rumors abound on the internet: if a particular client application or standards-violating ISP DNS resolver decides to cache old responses for significantly longer than the sanctioned TTL, there is nothing that we as the authoritative DNS provider can do about it – beyond suggesting that individual impacted users may want to reboot and/or switch to one of the various public DNS resolver services as a workaround.

About CNAME Records

When you create a Stand-alone CNAME Record pointing to a domain name handled by DNS Traffic Control, the alias name automatically benefits from the DTC behavior of the target name:

www.example.illinois.edu. 3600 IN CNAME example.illinois.edu.
example.illinois.edu.     60   IN A     18.217.84.3

No DTC configuration is required for the alias name www.example.illinois.edu, because that portion of the response is always the same; only the A record for example.illinois.edu is dynamically synthesized.

Note also that you do not need to set a short TTL on the CNAME record; the TTL values in the sample response shown above appropriately reflect our expectations that the CNAME record will be stable but the A record might change suddenly.

Glossary

DTC Server: represents a single target IP address which is capable of providing your service.  Note that DTC Server objects do not necessarily correspond 1:1 to your real servers, since

  • a single DTC Server might target a Server Load Balancing (SLB) VIP which distributes incoming client requests among multiple real servers.
  • a real server with both an IPv4 address and an IPv6 address will require two separate DTC Server objects, one per address (assuming you wish to use DNS Traffic Control for both A and AAAA responses).

Health Monitor: a test performed independently by each authoritative nameserver to determine whether a DTC Server is healthy

DTC Pool: a grouping of one or more DTC Servers with a load balancing method for choosing among them

Load-Balanced Domain Name (LBDN): a slightly misnamed object which maps one or more domain name patterns to a grouping of one or more DTC Pools, with a load balancing method for choosing among them

DTC LBDN Record: a manifestation of the LBDN which automatically appears within associated DNS Zones based on the LBDN’s domain name patterns.  Technically LBDN Records are separate objects from the LBDN, but you don’t normally need to worry about this distinction.

DTC A (or AAAA) Record: record data associated with a DTC Server which is used to synthesize DTC query responses.  Usually auto-populated based on the DTC Server’s IP.

Load Balancing Methods

Global Availability: always selects the first available target from an ordered list.  Use this for active/passive failover.

Ratio:Fixed: randomly selects an available target each time, optionally “weighted” to select certain targets more often than others.  Use this for active/active load distribution.

Keep in mind that DNS response caching makes this an imprecise mechanism for controlling actual server load; if you need finely tuned load balancing, consider using network-layer SLB instead of or in addition to DTC (see below).

All Available (Pool only): instead of returning just one address record at a time, return the address records for all healthy Servers in the Pool (omitting any unhealthy ones).  This is an alternative active/active method which behaves more like traditional “round-robin DNS” (see also below), but cannot be used in DNSSEC signed zones because the number of distinct responses it might hypothetically produce is an exponential power set.

We don’t use DNSSEC signed zones as this time, but plan to do so in the future.

Topology: selects a target by evaluating the source IP address of each incoming query against a custom-configured set of rules (note that this source IP usually belongs to the recursive DNS resolver rather than the end user).  Use this e.g. if you need to provide a different answer to on-campus vs off-campus clients – or at least, to clients currently using an on-campus DNS resolver vs clients currently using an off-campus DNS resolver.

Beware of edge cases which may blur the distinction between on- and off-campus clients, such as split-tunnel VPN and AWS Enterprise VPCs.  Consider carefully what will happen in the event that such a client receives the “on-campus” answer from DNS Traffic Control but then actually connects to your service from an off-campus source IP, or vice versa.

Round Robin: rotates through the available targets in ordered sequence, returning the “next” one for each successive query (1, 2, 3, 1, 2, 3, …).  This alternative active/active method involves maintaining state on the nameserver, which will expire if no matching queries are received for a while (empirically around 60s) causing the sequence to restart deterministically from 1.

In practice this can produce extremely uneven response distributions for records which are less frequently queried, so Ratio:Fixed is usually a better choice even if you don’t need to assign a different “weight” to each target.

Configuring DNS Traffic Control

Unfortunately we are not able to offer any self-service configuration of DTC objects within IPAM at this time.  We are hopeful that future software releases from the vendor will provide enough granular permissions that we can safely open up at least partial self-service, but for now, all DTC configuration changes should be made by request to hostmgr (except fallback records, which are not themselves DTC).

The following documentation will walk you through the design process step by step; we encourage you to read through all the steps, and then submit one request with as much detail as possible.

1. Configure Non-DTC Fallback Records

First, follow the usual self-service steps to create one or more normal Stand-alone A and/or AAAA Records for each fully-qualified domain name (FQDN) which will be handled by DNS Traffic Control.  Ultimately these static records will be unused most of the time, but they will be returned as a fallback whenever DNS Traffic Control is unable to synthesize a satisfactory query response targeting a known healthy DTC Server.  Broadly speaking, this can happen for two reasons:

  1. Your servers are working, but something is wrong with DNS Traffic Control’s monitoring of your servers.  Consider in this scenario what static DNS response would generally give clients the best chance of successfully using your service.

    Note that it is common for DTC to return fallback records for up to 1 second after a behind-the-scenes service restart in which other DTC configuration changes are being applied (even if those changes have nothing to do with your LBDN).

  2. None of your servers are working.  Consider in this scenario what static DNS response would be most useful to have already cached (by recursive DNS servers and/or client applications) at the moment when your servers begin working again.

Be sure to set a custom TTL (e.g. 60 seconds) on your fallback records so that they will not remain cached for too long once DTC is again able to synthesize a response.

The two most common choices for a fallback resource record set are:

  • all of the eligible target IPs (essentially falling back to traditional “round-robin DNS“)

    Note: in this case, if you want the target IPs to have matching PTRs pointing back to the service FQDN (and assuming the target IPs do not have other PTRs already) you may opt to create a fallback Host record rather than stand-alone A/AAAA records.

  • just one of the eligible target IPs (this might be preferable in some active/passive use cases where there is a significant penalty associated with actually using the secondary server)

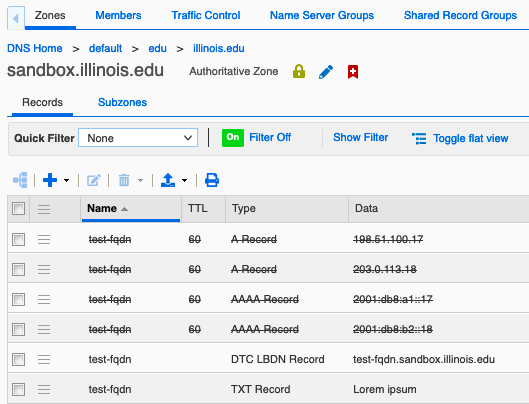
Once your DTC LBDN is configured, Grid Manager will display the fallback records in strikethrough font as a visual reminder that they are masked by DTC:

2. Choose or Customize a Health Monitor

Next, decide how IPAM should determine the health of your DTC Servers (i.e. target IP addresses).  You can use one of the default pre-defined Health Monitors (icmp, http, or https), or email hostmgr to request a customized Health Monitor for your service.

Try to choose a health monitor that will not be blocked by firewall policy; by default, each authoritative nameserver performs its own health monitor testing independently of the others, and not all of them have University of Illinois System IP addresses.  If necessary we can work around this with consolidated health monitor settings (configured per Pool, details further down).

Best Practice

The most powerful and flexible health check is achieved by configuring a DTC Health Monitor to invoke your own HTTP-based self-test routine which runs on each target server and answers to “GET /healthcheck HTTP/1.0” or similar, returning HTTP response status code 200 (OK) if and only if the server is healthy.

Advantages of this approach:

  • Your self-test implementation can do anything you want and be as elaborate as you like, yet the interaction with DTC is very simple and easy to troubleshoot.
  • You can manually disable the self-test response (while leaving the actual service running) to gracefully “drain” a server of clients before taking it offline for maintenance.
  • You can use the same health check for both DTC and SLB if desired.

Caution: be careful not to create a denial-of-service vector for your servers by performing lengthy or resource-intensive operations upon every single HTTP request.  If such operations are needed, perform them periodically and cache the results.

Note that DTC can be configured to send HTTP health monitor requests to any port, and if necessary even to an alternate IP address (e.g. if your actual servers are non-customizable appliances).

Please provide the following details when requesting a customized Health Monitor:

  • Interval (seconds): how long to wait between the end of one health monitor cycle (either receiving a response or timing out) and sending the next request to the same DTC Server.  Default: 5s
  • Timeout (seconds): how long to wait for a response before giving up.  Default: 15s
  • Retry Up Count: number of consecutive successes for a currently unhealthy server to be marked healthy.  Default: 1
  • Retry Down Count: number of consecutive failures for a currently healthy server to be marked unhealthy.  Default: 1
  • protocol: choose one of
    • ICMP (ping): sends an ICMP or ICMPv6 echo request and expects an ICMP/ICMPv6 echo response.  No additional parameters.
    • HTTP: sends an HTTP request and optionally examines the response
      Parameter Default Remarks
      Port 80
      HTTP Request GET /

      May be a multi-line message including HTTP headers.  Recommended examples:

      GET / HTTP/1.0
      GET / HTTP/1.1
      Host: example.illinois.edu
      Connection: close

      Note that we do not generally recommend using the HTTP/0.9 request format (e.g. “GET /” without HTTP-Version) because HTTP/0.9 responses do not include a status code; see RFC 1945 for more information.

      Response Code Check any response code is valid may require a specific HTTP response status code (e.g. 200) or accept any
      Response Content Check do not check may search first 5KB of headers, body, or both using a POSIX Extended Regular Expression, and optionally perform additional validation on the matched content
    • HTTPS: sends an HTTPS request and optionally examines the response
      Parameter Default Remarks
      Port 443
      HTTP Request GET / (same as HTTP above)
      Enable Certificate Validation false boolean
      Enable SNI (Server Name Indication) false boolean (the SNI Hostname to use is configured in each DTC Server)
      Response Code Check any response code is valid (same as HTTP above)
      Response Content Check do not check (same as HTTP above)
    • TCP: opens a TCP connection to the specified port (successful when the handshake completes)
      Parameter Default
      Port no default (must be customized)
    • SIP, PDP, SNMP: talk to us if you feel that one of these might be appropriate for your service
  • internal display name

    There is a single global namespace for all DTC Health Monitor objects, so try to choose something reasonable that begins with your department or group.

  • Owned By Domain: the name(s) of one or more domain models (from Contacts Database) that should confer “ownership” rights to this object.  Self-service management of DTC objects is not possible at this time, but any user with permissions on any of the named models will be authorized to request changes through hostmgr.

You can examine Health Monitors under Data Management > DNS > Traffic Control, Toolbar: Manage Health Monitors

3. Configure DTC Servers

Please email hostmgr to request creation or modification of DTC Server objects.  Provide the following details for each:

  • the IPv4 or IPv6 address which should be returned in response to A or AAAA queries when this DTC Server is selected as the answer
  • (optional) any Health Monitors for this DTC Server which must target a different IP address than the one returned in response to queries
  • (optional) an alternate SNI Hostname to be used for HTTPS Health Monitors
  • internal display name

    This name has no functional effect on DNS behavior; it is used only for administrative purposes within Grid Manager.  There is a single global namespace for all DTC Server objects, so try to choose something reasonable that begins with your department or group.

  • Owned By Domain: the name(s) of one or more domain models (from Contacts Database) that should confer “ownership” rights to this object.  Self-service management of DTC objects is not possible at this time, but any user with permissions on any of the named models will be authorized to request changes through hostmgr.

Once configured, you can examine DTC Server objects under Data Management > DNS > Traffic Control.

4. Configure DTC Pools

Please email hostmgr to request creation or modification of DTC Pool objects.  Provide the following details for each:

  • which DTC Servers should be members of this Pool

    Note that it is possible to add the same DTC Server to multiple Pools.

  • which Load Balancing method should be used to select a member (choices are described above under “Load Balancing Methods”)
  • which Health Monitors should be applied to all members (targeting the main IP address configured for each DTC Server object)
  • (optional) Consolidated Health Monitor settings: should off-campus nameservers use health status information obtained by the on-campus nameservers, instead of performing their own independent tests?

    This workaround makes it possible to use DNS Traffic Control for internal use cases where your entire service (and perforce also the health monitor target) is only reachable from on campus.

  • internal display name

    This name has no functional effect on DNS behavior; it is used only for administrative purposes within Grid Manager.  There is a single global namespace for all DTC Server objects, so try to choose something reasonable that begins with your department or group.

  • Owned By Domain: the name(s) of one or more domain models (from Contacts Database) that should confer “ownership” rights to this object.  Self-service management of DTC objects is not possible at this time, but any user with permissions on any of the named models will be authorized to request changes through hostmgr.

Once configured, you can examine DTC Pool objects under Data Management > DNS > Traffic Control.

5. Configure the LBDN

Please email hostmgr to request creation or modification of a DTC LBDN object for your service.  Provide the following details:

  • one or more fully-qualified domain names (FQDNs) for which this LBDN object should synthesize responses, e.g. example.illinois.edu

    Best Practice

    Wherever possible, configure the LBDN to synthesize responses for a single primary FQDN, and implement any additional FQDNs using CNAME Records:

    www.example.illinois.edu. IN CNAME example.illinois.edu.
    myothersubdomain.illinois.edu. IN CNAME example.illinois.edu.

    Assign multiple FQDNs to the same LBDN only if they cannot be implemented as aliases (e.g. because they reside at the apex of a zone).

  • the TTL value to return for synthesized responses, e.g. 60 seconds
  • one or more DTC Pools to use

    Note that it is possible to add the same DTC Pool to multiple LBDN objects.

  • which Load Balancing method should be used to select a Pool (if using more than one)
  • internal display name

    This name has no functional effect on DNS behavior; it is used only for administrative purposes within Grid Manager.  There is a single global namespace for all DTC Server objects, so try to choose something reasonable that begins with your department or group.

  • Owned By Domain: the name(s) of one or more domain models (from Contacts Database) that should confer “ownership” rights to this object.  Self-service management of DTC objects is not possible at this time, but any user with permissions on any of the named models will be authorized to request changes through hostmgr.

Once configured, you can examine LBDN objects under Data Management > DNS > Traffic Control.

You can also see their DTC LBDN Records which appear within the associated DNS Zones.

screenshot

The screenshot below shows a DTC LBDN Record along with two fallback A records and two fallback AAAA records (displayed in strikethrough font as a visual reminder that they are not used except as a fallback).  Note that this screen does not display the TTL or the possible IP addresses which might be returned by the LBDN itself (since these do not necessarily correspond to the fallback records).  The TXT record for the same domain name is completely unaffected by DNS Traffic Control.

Monitoring DNS Traffic Control

You can see the health status of your DTC objects in Grid Manager by navigating to Data Management > DNS > Traffic Control.

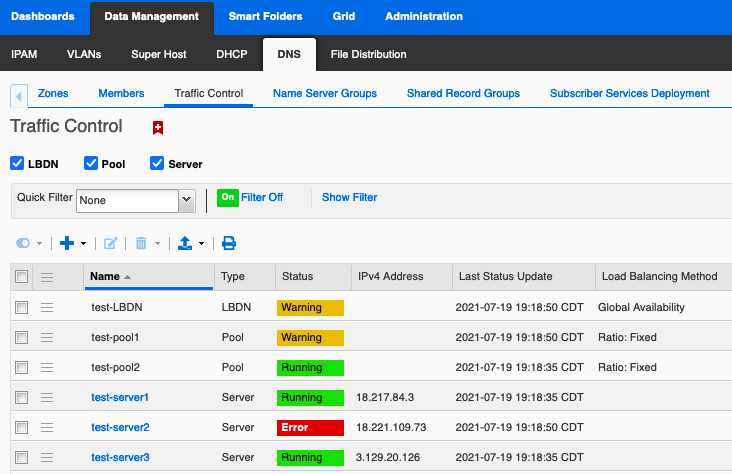
Notice the “Last Status Update” time!  When your server goes down or comes back up, the underlying health check and actual DNS query responses will update quickly, but it may take a few minutes for the new status to be displayed in Grid Manager.

Select an object and click “Show Visualization” from the Toolbar panel on the right to see at a glance how this object relates to other DTC objects.

Comparisons with other technologies

The following sections discuss similarities, differences, and trade-offs between DNS Traffic Control and several other technologies which can be used for similar purposes.

DTC vs Traditional Round-Robin DNS

Publishing several static (non-DTC) A or AAAA records for the same domain name, a technique known as “round-robin DNS“, is a simple and time-honored way to achieve basic active/active load distribution and (sometimes) fault tolerance among multiple target IPs.

Most recursive DNS resolvers will randomly permute the order of the record set for each response, and most clients will initially try whichever IP appears first in the list they receive.  If that first IP doesn’t work, many clients are smart enough to automatically try another one, although this may involve a noticeable delay (outcomes vary widely depending on client implementation).  Without manual intervention, the unhealthy IP will continue to appear in round-robin DNS responses and thus continue to impact the end-user experience for some fraction of new clients until service is restored.

DNS Traffic Control attempts to improve upon this user experience by no longer returning an address record for the unhealthy IP, thereby (eventually, once the old response has expired from all caches) directing all new connections to a healthy IP.

It is worth noting that in certain pathological cases (see also “TTL Caveat” above), an improperly-cached stale DTC answer containing only the now-unhealthy IP could actually produce worse outcomes than a cached traditional round-robin answer containing all of the IPs.

Of course DTC also offers some additional options which can’t be implemented using traditional round-robin DNS, including active/passive and topology-sensitive behaviors.  But if simple active/active is what you want, it’s worth considering whether traditional round-robin DNS might be good enough (perhaps with a moderately low TTL to facilitate manual changes in response to a protracted outage) before deciding to implement DTC.

Note that despite having a similar name, the Round Robin DTC load balancing method has nothing to do with traditional round-robin DNS.

DTC vs network-layer Server Load Balancing (SLB)

In typical internet applications (e.g. web browsing), the client first uses DNS to resolve a target domain name into a destination IP address, and then initiates a connection to a server listening on that IP address.

DNS Traffic Control alters the first part of this process by returning a different DNS record so that the client will connect to a different IP address.  Network-layer Server Load Balancing (SLB) alters the second part of the process by distributing client requests made to the same virtual server IP address (VIP) among different real servers behind the scenes.

SLB offers two comparative advantages over DTC:

  • SLB offers better fault tolerance for individual real server failures, because failover is transparent to the client; existing clients need only reconnect to the same VIP, and new clients are not impacted at all.  By contrast, failover in DNS Traffic Control requires client cooperation and is subject to the potential pitfalls described in “TTL Caveat” above.
  • Because SLB handles individual client connections, it can perform true load balancing (i.e. spreading the workload evenly among multiple active real servers).  The best DNS Traffic Control can do is to provide different answers to different recursive DNS resolvers and trust to the law of large numbers to distribute the overall workload, which may not be effective e.g. if many clients are all using the same recursive DNS resolver, or if a few clients generate disproportionately large numbers of connections.

The primary limitation of SLB is that it is only available in certain locations and places additional constraints on the networks your real servers may belong to; see Server Load Balancing (SLB) for details.

The comparative advantage of DNS Traffic Control is that it can provide failover and load distribution between multiple geographically-distributed sites where sharing the same virtual IP address is not possible, thereby offering some protection (subject to “TTL Caveat” above) against a total failure of one of the sites.

DTC and SLB can also be used in tandem, with DTC directing clients to one of several SLB VIPs (which may in turn be located at different sites).  Note in this scenario that DTC will need a way to monitor the health of each SLB VIP.

DTC vs Global Server Load Balancing (GSLB)

GSLB is a term commonly used by many other vendors to describe the same functionality which we (and our vendor) call DNS Traffic Control.  We prefer the term DNS Traffic Control because it is more descriptive of the actual behavior and less easy to confuse with SLB.

DTC vs Amazon Route 53 DNS Failover

Amazon Route 53 DNS Failover provides functionality very similar to DNS Traffic Control, but for DNS domains or subdomains which have been delegated to Route 53 (see AWS Authoritative DNS Guide for Illinois) instead of domains which are served by IPAM.

The main advantage of Route 53 DNS Failover is that it can take advantage of what AWS already knows about your target resources, e.g. automatically evaluating the health of alias records for Elastic Load Balancers.

DTC vs Virtual Alias records

See Virtual Alias records vs DNS Traffic Control.

Getting Started with IPAM

This page contains information about navigating the Grid Manager web interface once you have logged in.

Logging In

See How do I log in?

Getting Help

If you have a question not covered by this service documentation, you can try one of the following resources or contact hostmgr for assistance.

Help Panel

All screens and dialog windows in Grid Manager contain context-sensitive help, which appears in the Help panel on the far right-hand side of the window.

  1. If the Help panel is not visible, click the grey “?” icon on the far right to expand it.
  2. Some Help panels contain vertically expanding subpanels.  Expand the subpanel labeled “Help” to see context-sensitive help for the screen you are on.
  3. When you don’t need the Help panel, you can collapse it again to save space.

Vendor Documentation

Extensive vendor documentation for Grid Manager is published in HTML and PDF formats.

Please note that not all functionality described in the vendor documentation is available to you in the University of Illinois IPAM service.

You may find it helpful to peruse the section entitled “About the Grid Manager Interface” when logging in to Grid Manager for the first time.

Browser Information

The vendor documentation includes requirements for your workstation (including minimum display resolution) and known limitations for certain browsers.

A few general tips:

  • Please be patient with the web interface; occasionally it will take a few seconds to finish refreshing after you have clicked on something. Clicking repeatedly will not help, and in fact will probably make you wait longer for the interface to catch up.
  • Don’t use your browser’s Back button within Grid Manager.
  • Don’t use Grid Manager in multiple tabs or windows of the same browser, as they may interfere with each other.
    (However, we have had success using Grid Manager concurrently in two separate browsers, e.g. in one instance of Chrome and one instance of Firefox.)

The list of OS and browser versions tested and validated by the vendor is now maintained in the release notes (which are not publicly viewable), but generally includes recent releases of Firefox, Chrome, Safari, and Edge.  Let us know if you consistently experience problems with the latest version of any of these browsers, and also whether the problem is solved by using a different browser.  Note that Mozilla offers a Firefox Extended Support Release (ESR) which may be helpful in some circumstances.

Basic Navigation: a Guided Tour

If this is your first time using IPAM, we encourage you to actually log in now and follow along with this tutorial.

Upon first login, Grid Manager will display the (fairly sparse) Tasks Dashboard, which doesn’t do much but serves as a landing page.

To illustrate some basic principles of Grid Manager navigation, we’ll begin by browsing Networks in DHCP View.  This is not what you’ll usually do in practice, but it’s the simplest place to start.

Browsing Networks in DHCP View

To display Networks in DHCP View:

  1. Choose “Data Management” from the top row of tabs.
  2. Choose “DHCP” from the second row.
  3. Choose “Networks” from the third row.
  4. Choose “Networks” from the fourth row.

This will display a table containing all Networks that you have permissions on.

screenshot

Unfortunately the Network Name column is not displayed by default, but you can easily add it to the table; see Customizing Table Columns.

Using the Table Controls

Just above the table in the main workspace is a row of icon buttons.  Mouse over each icon in turn to see their names:
Open, Add, Edit, Delete, Export, and Print.

  • To Edit a Network from the table, select the checkbox to its left, and then click the Edit (notepad) icon above the table.

    screenshot

    This opens the Edit Network dialog box. You don’t have permissions to change anything in the Edit Network dialog box, but you can use it to examine the DHCP configuration properties of your Network.  To close the dialog box and return to the table, click Cancel (in the lower left).

  • To Open a Network from the table, just click directly on its address/CIDR (e.g. “192.168.0.0/26”) in the Network column.  Alternatively, you could select its checkbox and then click the Open (right arrow) icon above the table.  Opening a Network takes you to a new screen which we will discuss in the next section.

The hamburger menu icon in each table row displays a shortcut menu which provides yet another way to Open or Edit the Network in that row.

screenshot

If your table contains too many rows to display all at once, you can

  • use the page navigation buttons (below the table, on the left) to page through them.

  • start typing the first several characters of a network address e.g. “192” into the “Go to” box (above the table, on the right) to quickly select a matching row. 

    “Go to” only matches one field (whichever one Grid Manager considers to be the primary identifier), so you can’t use it to find e.g. Network Name even if you have added a Network Name column to the table.
  • click “Show Filter” and Apply desired filter criteria to display fewer results.  (Note that you can Filter based on Network Name.)

    screenshot

Opening a Network (DHCP View)

When you Open a Network as described above, the main workspace displays a new table containing all DHCP-related objects (Fixed Addresses, Ranges, and DHCP-enabled Hosts) that have been configured within that Network.

screenshot

From here you could go on to perform a variety of DHCP configuration tasks.

For now, just familiarize yourself with the following new interface elements near the top of the main workspace:

  • The breadcrumb link “Networks Home” (just below the four rows of navigation tabs) may be used to return to the list of all Networks.
  • Next, Grid Manager displays the currently opened object (“192.168.0.0/26”) and its type (“IPv4 Network”).
  • Click the nearby blue pencil Edit icon to Edit the currently opened object.

    Note the difference between this blue pencil Edit icon which edits the currently opened object, and the notepad Edit icon further down which edits the object whose checkbox is selected from the table.
  • Click the Bookmark (red swallowtail flag) icon to bookmark the currently opened object so you can quickly navigate back to it later (see Advanced Tips and Tricks).
  • Click “Go to IPAM View” to Open the current Network in IPAM View (discussed further down) instead of DHCP View.  This is a convenient way to quickly switch between these two views of the same Network.

Opening a Zone

When you open a DNS Zone object as described above, the main workspace displays a table containing either the Records or the Subzones within that Zone (depending on which tab you select from the fourth row underneath the Zone name).

screenshot

Note the following controls near the top of the main workspace:

  • Multiple breadcrumb links allow quick navigation to any ancestor of the current zone, including the DNS View (“default”).  “DNS Home” may be used to return to the list of Views.
  • Click “Toggle flat view” on the Records tab to change the way Host records are displayed in this table.  After you click it, the link text changes to “Toggle hierarchical view”.

    We recommend using Flat view for the Records tab, to ensure that you will always see all manifestations of Host records.

  • Optionally (and independently), click “Toggle flat view” on the Subzones tab to display all descendants of the current zone instead of only its immediate children (note that this may cause the interface to respond more slowly).  Navigate back up to “edu” for a clear illustration of the difference.

Browsing Networks in IPAM View

IPAM View is another way of looking at Networks.  Whereas DHCP View is narrowly focused on DHCP functionality, IPAM View combines configuration data from both DNS and DHCP into a holistic picture of how every IP address in a network is being used (or not – it also displays unused IPv4 addresses).  IPAM View also shows Network Containers which organize Networks into a hierarchical tree structure.

To browse Networks and Network Containers in IPAM View (again, this is intentionally not the quickest method):

  1. Choose “Data Management” from the top row of tabs.
  2. Choose “IPAM” from the second row.

  3. The main workspace will display any top-level Network Containers (shown with a folder icon) which contain at least one Network that you have permissions on.  Note that you don’t have permissions on the Network Container itself, so you can’t see any other details about it.

    screenshot

    This is a separate table from the one we saw earlier in DHCP View, so you’ll want to add the Network Name column again here.

  4. Open a Network Container by clicking its address/CIDR.  At this point a third row of tabs appears with “Net Map” selected by default, and the workspace displays a graphical visualization of the contents of this Network Container (which may include other Network Containers and/or leaf Networks), subject to your permissions.

  5. Choose “List” from the third row of tabs to display the contents of this Network Container in a table instead.

    screenshot

    Note that Network Containers have a folder icon, while leaf Networks have an icon with no folder.  There is also a “Toggle flat view” link which behaves similarly to the one described above for DNS Subzones.

  6. Open a leaf Network by clicking its address/CIDR.

Opening a Network (IPAM View)

When you open a leaf Network in IPAM View, you can choose “IP Map” from the third row of tabs to display a graphical representation of how each address in the network is used, or choose “List” to display the addresses in a table (generally more useful).

screenshot

From here,

  • Click “Go to DHCP View” to open the current Network in DHCP View (instead of IPAM View).  This is a convenient way to quickly switch between these two views of the same Network.

    In general IPAM View is more powerful, but some DHCP configuration tasks can only be performed (and others are easier) in DHCP View.

  • If you select an IP address which is used by only one object, you can click the Edit (notepad) icon above the table to Edit that object.
  • Open an IP address (by clicking on it in the table) to display all of its Related Objects in a new table where you can Edit or Delete them individually.  Use the breadcrumb links to return.

    screenshot

  • Be very careful with the Reclaim button (see Reclaiming Objects Associated with IPv4 and IPv6 Addresses in the vendor documentation).  When in doubt, it’s safer to examine the Related Objects individually and make a decision about whether to edit or delete each one.
  • Please do not use the Ping button (see known issues involving Discovered Data).

Global Search

The step-by-step browsing methods above are very helpful for learning how Grid Manager works, but they aren’t usually the quickest way to reach your goal.  Grid Manager provides several practical navigation shortcuts, the most important of which is Global Search.  (Some others will be discussed later in Advanced Tips and Tricks.)

Click the Search (magnifying glass) button in the upper right-hand corner of the interface window to open the Search dialog box.

Use Basic Search to quickly locate objects matching a specific IP address, MAC address, or DNS Name:

  1. Select the “Basic” tab.

  2. Click the left-most drop-down (“Choose Filter”) and select DNS Name, IP Address, or MAC Address.
  3. Optionally select a different operator from the middle drop-down.
  4. Type the desired search value in the text box on the right.
    Please note:

    • MAC Address values should be punctuated with colons, e.g. “aa:aa:aa:00:00:10

    • When searching by DNS Name, try to use at least a partially-qualified name.  For example, searching for “www.techservices” is much more efficient than searching for “www“.

  5. Click “Search”.
    (see screenshot under examples below)

or use Advanced Search for other types of searches:

  1. Select the “Advanced” tab.
  2. In the first filter criterion (Type equals All), click the right-most drop-down (All) to select what type of objects you want the search to return, such as “All Networks” or “All Zones”.

    If you do not filter by Type, then by default Grid Manager will search ALL objects in its database. While you might need to do this on rare occasions (if you aren’t able to find what you want using a more specific search), it takes a lot longer, and is also more likely to return a large number of uninteresting results.

  3. Type your desired search value into the main (unlabeled) text box above the filter criteria.  You can enter a regular expression in this field; see Supported Expressions for Search Parameters in the vendor documentation for details.
  4. Check “Include Extensible Attributes Values” in case the value you are searching for appears in an extensible attribute (such as Network Name).  If you leave this unchecked, only built-in object fields will be searched.

  5. Optionally click “+” to add more filter criteria.
  6. Click “Search”.
    (see screenshot under examples below)

Once your search results are displayed, you may:

Using IPAM

This page contains information about using IPAM Grid Manager to manage DNS and DHCP configuration.

Introduction

IPAM, which stands for “IP Address Management”, is the integrated platform used by IT professionals to manage DNS and DHCP configuration for their networks and authoritative zones served by campus DNS and DHCP.

The user interface for IPAM is called Grid Manager.

How do I gain access to IPAM?

IT Professionals listed in Contacts Database with the “DNS Requests” permission for one or more network(s) and/or domain(s) may log in to IPAM Grid Manager and make changes to objects and records within those network(s) and domain(s).

The preferred way to obtain Contacts Database permissions for an existing network or domain is to contact the person responsible for that network or domain and ask them to grant you permissions.  If you cannot identify this person, feel free to contact hostmgr@illinois.edu for help.  Please note, however, that bulk permission change requests should be submitted to the Contacts Database team via consult@illinois.edu.

Updated permissions in Contacts Database are automatically read and imported into IPAM nightly.

Note that this nightly job currently takes a long time to run, typically (as of Nov 2021) finishing all its work in IPAM by 11am on the following day.

Employees with a home campus other than Urbana must have an account in the Urbana UofI Active Directory in order to access IPAM.

About Contacts Database

Contacts are the people (or distribution lists) who should be informed when problems or questions arise regarding this domain:

  • The Primary contact is the technical person who has operational (day-to-day) responsibility for the domain and will be contacted first regarding any questions or problems.
  • The Backup contact will be contacted if the Primary contact is unavailable or does not respond.
  • The Administrative contact is managerial rather than technical (typically a department head or business manager), representing the unit that owns the domain and pays for it.  They will be contacted for help re-establishing Primary and Backup contacts if the ones listed are out of date or not responding.
  • You may list more than one Primary, Backup, or Administrative Contact.  You may also list contacts of type “Other” who are allowed to view the domain in Contacts Database but who will generally not be contacted with questions about the domain.
  • To avoid confusion, don’t use the Service-specific contact types “Service Owner” and “Service Liaison” for Domains and Networks.  (If these are present, we will treat them as type “Other”.)
  • Please list at least two Primary/Backup contacts (i.e. two Primary or one of each) and at least one Administrative contact.
  • Please do NOT list the same person in multiple contact roles.

Permissions identify the Active Directory users (or groups) who are allowed to manage this domain:

  • Change Contacts permission-holders can update the information in Contacts Database (which includes granting and revoking permissions), and are expected to keep this information up to date as people leave the University, change jobs, etc.
  • DNS Requests permission-holders can perform self-service tasks in IPAM Grid Manager and request non-self-service changes from hostmgr@illinois.edu.  Note that requests for certain major irrevocable changes such as deactivating a domain or transferring it to another owner will be reconfirmed with a Primary contact (unless originated by a Primary contact).

Note that Contacts and Permissions are entirely separate concepts; it is common to grant Permissions to the same people who are Contacts, but not required.

Networks in CDB have DNS Requests permission too, but they can also have other types of permission which are used to manage access to other services.  See Contact Types in Contacts Database (CDB) for more information.

How do I log in?

Visit https://ipam.illinois.edu and click the “SSO Login” button (without entering anything in the text boxes) to authenticate using Shibboleth single sign-on.

When the Shibboleth identity provider redirects you back to IPAM, you will be automatically logged in and should see a (fairly sparse) dashboard page.  If you instead end up back at the IPAM login screen, or if you see “Error: ‘Auto Create User’ option disabled, login denied”, this probably means you don’t currently have permissions to access IPAM (see How do I gain access to IPAM? above).

Technical notes:

  • The “SSO Login” button requires your browser to briefly connect to an additional non-standard HTTPS port (8765/tcp) on the Grid Manager server, which may not work if you are behind a firewall that restricts outbound connectivity.

Alternative Login Method

  • Multi-Factor Authentication (MFA) is still required.  IPAM is not able to prompt you interactively for a second authentication factor, but you can append a passcode or factor name to your password as documented in https://guide.duo.com/append-mode.

    If you don’t append anything to your password, you should automatically receive a push notification (if you have a smartphone registered for Duo).

    If you have more than one smartphone registered for Duo, you might need to append e.g. “,push2” to use your second device.

    If your actual password happens to contain any commas (the delimiter character for append mode), we suggest always appending something (e.g. “,push”) so that your authentication can succeed on the first try without requiring an extra round-trip to AD on the back end.

  • For UIC and UIS employees, be sure to enter the userPrincipalName of your Urbana UofI Active Directory account (typically yournetid@illinois.edu), not yournetid@uic.edu or yournetid@uis.edu

Your user profile for the Alternative Login Method will not reflect any customizations you have previously made while using SSO Login, nor vice versa.  See this known issue for details.

How do I log out?

Your Grid Manager session will automatically log out if it is idle for over 4 hours.  To log out manually, click the drop-down control labeled with your username in the upper right-hand corner of the interface, and select “Sign Out”.

In either case, logging out from IPAM does not end your Shibboleth identity provider session, which means you may still be able to click “SSO Login” and get right back in again.  You can prevent this by additionally visiting https://shibboleth.illinois.edu/idp/profile/Logout or by completely closing your web browser (see also Logging out of individual web applications with Shibboleth).

How soon will my changes take effect?

Many changes made in Grid Manager take effect instantly. Other changes (e.g. creating a DHCP Range) take effect only after a behind-the-scenes service restart, which will automatically occur within 5 minutes of making such a change.

Keep in mind that DNS records are routinely cached in accordance with their TTL (time-to-live) values.  Even though authoritative DNS record changes take effect instantly in IPAM, some clients may continue to see the old record data until it has expired from all caches.

For changes to high-profile DNS records (e.g. migrating a live production service), Technology Services recommends that you temporarily lower the TTL of the record in question (e.g. to 1 minute) at least one hour prior to making the actual change, and then restore the TTL to the campus default (1 hour) after the change is complete and you have confirmed that everything is working properly.

If you don’t want your changes to take effect immediately, see the section on Scheduled Tasks in Advanced Tips and Tricks.

Getting started and navigating the interface

New users should start at Getting Started with IPAM. This page contains basic information about navigating the Grid Manager web interface once you have logged in.

DNS Configuration Tasks

Host Records explains how to create, edit, and delete Host records.

Stand-alone DNS Records explains how to create, edit, and delete all other types of DNS records.

DNS Traffic Control explains how to dynamically adjust DNS query responses based on server health checks.

DHCP Configuration Tasks

DHCP Ranges (Dynamic Pools) explains how to configure a pool of IP addresses that can be assigned interchangeably to any eligible DHCP client.

DHCP Fixed Addresses explains how to configure an individual IP address for use exclusively by a single DHCP client.

Managing DHCP Leases contains information about working with leases, which represent the allocation of a particular IP address to a particular client for a specified period of time.

Advanced Features

Advanced Tips and Tricks contains some additional tips to help you use Grid Manager more efficiently. These tips will be most helpful to users who have already logged in once or twice and have familiarized themselves with the basics. If you’re just getting started with Grid Manager, we recommend you skip this section for now and come back to it later on.

CSV Imports and Exports gives instructions on how to to perform “bulk” updates which create or modify many DNS and/or DHCP objects at once.

Using the IPAM API contains information about using Grid Manager’s application programming interfaces.

Customized Training

If you’d like free, customized training for your particular unit or department about how to manage DNS and DHCP using Grid Manager, contact hostmgr@illinois.edu.

Known Issues

Known Issues contains information about known issues with Grid Manager that may be relevant to campus network administrators.

DNS Standards

This page contains information about implementation details related to the campus domain registration policy.

Introduction

This document describes the standard as set forth by Technology Services pertaining to the governance and rules of the Domain Name System (DNS) Service at the University of Illinois, Urbana-Champaign campus.

EDUCAUSE and the American Registry for Internet Numbers (ARIN) have delegated second level domains and IP address blocks (respectively) to Technology Services, acting on the authority of the University of Illinois at Urbana-Champaign, with the agreement that DNS service will be properly maintained and configured.

Technology Services provides DNS service to the Urbana-Champaign campus and controls allocation, management and delegation of these zones.

Terminology

American Registry for Internet Numbers (ARIN): An organization that allocates IP address space to the University of Illinois at Urbana-Champaign.
Delegation: handing over authority for a portion of the DNS namespace (thereby establishing a new zone)
Domain: a logical subtree of the hierarchical DNS namespace, headed by a domain name such as illinois.edu or example.com
Domain Name: a string of labels separated by dots which identifies an entity on the Internet. Examples: illinois.edu, example.com, www.techservices.illinois.edu.
Domain Name System (DNS): A method of translating a readable name to an Internet Protocol (IP) address.
EDUCAUSE: Grants .edu domains and offers resources for the advancement of higher education to the education community.
FQDN (Fully Qualified Domain Name): The full entry in DNS for a machine, e.g. host.unit.illinois.edu.
Hostmgr (pronounced “host manager”): role within Technology Services who handles campus DNS change requests
Hostname: A domain name given to a network-attached device.
IP Address: A number to identify a device on a network.
IP Address space/block: A group of IP Addresses.
Subdomain: a logical subset (subtree) of another domain, named by prepending one or more additional labels. Examples: unit.illinois.edu and foo.unit.illinois.edu are both subdomains of illinois.edu.  Note that a subdomain does not necessarily require a separate zone.
Subnet: A subset of an IP address space.
Time to live (TTL): The amount of time the authoritative nameserver caches a record when queried by a caching server.
Third-level name: a domain name consisting of three labels.  Example: unit.illinois.edu.
Zone: a portion of DNS namespace delegated to and configured in a particular set of authoritative name servers.  All subdomains of the apex name are part of the zone unless delegated again to form a new zone.

Roles, obligations, and resources

Units DNS requests and maintenance are processed via the unit’s IT professional for network support (aka network admin).
The IT professional for network support is designated by the unit head in agreement with Technology Services.

To identify your network admin, please contact the Technology Services Help Desk.

The primary contact for DNS for Technology Services is hostmgr at illinois.edu.

General usage of DNS

The use of any domain name or IP address space that is managed by or associated with the University of Illinois at Urbana-Champaign must conform to the policy on Appropriate Use of Computers and Network Systems, which includes a prohibition on use of network resources for commercial or profit-making purposes or other purposes that interfere with the mission of the University.

Inter-unit DNS entries

Units wishing to create pointers from a domain they control to another unit (for example, cs.illinois.edu hostnames pointing into Beckman Institute subnets) should do so in cooperation with Technology Services. Technology Services will set up a discussion so that both groups are aware of the request and can coordinate the use of the new DNS entries.

External domain entries

Units should create and maintain their entries in cooperation with hostmanager, either via delegation or using the self-service management interface. Please see the section on non-.edu domains.

Reverse DNS (in-addr.arpa)

All hosts must have PTR records. This rule is enforced to help the campus be in compliance with industry best practice. As numerous services use PTR records, it can cause considerable problems to users if an IP does not have a matching PTR record.

Time-To-Live (TTL) recommendations

The Time-To-Live (TTL) DNS parameter is used to control how long DNS resolvers cache a DNS record. Setting a TTL value too low reduces the efficiency of caching and increases DNS server traffic/load. Setting a TTL too high means that DNS changes may not be recognized in a timely manner.

The campus standard for TTL records is 1 hour (3600 seconds). Contact hostmgr for changes to a domain’s TTL. TTL changes to individual records can be done by IT Professionals with appropriate access to the record in the IPAM appliance web interface.

Assignment of domains and subdomains

Acceptable Name Guidelines

Units requesting a new third-level name (e.g. xyz.illinois.edu) must meet the following guidelines from the Office of Strategic Communications and Marketing for acceptable domain names. (Pre-existing domains are ‘grandfathered’ under prior guidelines.)

  • The domain name can only contain the characters (a-z), -, and (0-9), which complies with the preferred name syntax guidelines in RFC 1035 (Section 2.3.1)
  • In general, avoid acronyms and initialisms unless they are universally recognized. For example, creativeservices.illinois.edu not cs.illinois.edu (which could be confused with Computer Science.)
  • Supportive of brand – the domain name should not be contrary to the Illinois brand. The UIUC initialism should not be used in newly created domain names.
  • Appropriateness – Language which could be considered derogatory, offensive, or misleading should be avoided.
  • Respectful of scope and role – Third-level campus domain names should reflect high-level organizations in the university (colleges, departments, inter-departmental organizations,) or campus-wide services (www, campusrec, careercenter). Since third-level names apply at the campus level, the requesting unit must have the authority to represent the organization or service indicated or implied by the name. For example, research.illinois.edu could only be requested by a unit on campus that speaks for all research at the campus level.

Name requests which violate these guidelines must be justified and go through an approval process.

Non-.edu domains

Domains outside the .edu namespace (.org, .net, etc) both incur cost and require the approval of the Office of Strategic Communications and Marketing. The following requirements apply in addition to the normal considerations for domain creations:

  • Must be registered through Technology Services.
  • Department/Unit pays registration, renewal, and/or transfer fees equal to the amount that Technology Services pays the registrar, plus $10 per year to Technology Services.
  • Changes to the domain must be kept to a minimum. There may be an additional fee for excessive changes to the domain. Typical traffic would be an initial set up and a few changes per year.

Approval / escalation process

Technology Services works with the Office of Strategic Communications and Marketing to obtain approval for new domain requests.

Approval Process
Unit Network Admin for host or subdomain assignments under an assigned domain, ie: hostname.unit.illinois.edu
Technology Services screens based on existing registrations, and technical and security concerns
Office of Strategic Communications and Marketing final ruling

Third-level subdomains of illinois.edu

Every third-level subdomain of illinois.edu MUST have a corresponding Domain model in Contacts Database, which must be kept up to date by the responsible department/unit.

Third-level subdomains can be implemented in one of two ways.

Separate zone

A third-level subdomain may be created as a separate DNS zone, which will be made available for self-service management via the IPAM web interface (and may contain an arbitrary number of fourth-level records).

This option has one significant drawback (resulting from an inherent technical limitation of DNS): if mysubdomain.illinois.edu is a separate DNS zone, then there cannot be a CNAME record at mysubdomain.illinois.edu.  In practice, this typically rules out web hosting solutions that do not offer static IP addresses.

Records in the illinois.edu zone

Alternatively, a third-level subdomain of illinois.edu may be registered as a CNAME record in the second-level illinois.edu zone, and accompanied by a small number of fourth-level subdomains (each of which may be either an additional CNAME record or a separate zone).  For example:

  • mysubdomain.illinois.edu  (CNAME record in the illinois.edu zone)
  • www.mysubdomain.illinois.edu  (CNAME record in the illinois.edu zone)
  • etc.mysubdomain.illinois.edu  (separate zone with self-service management)
  • name3.mysubdomain.illinois.edu  (either CNAME record or separate zone)
  • name4.mysubdomain.illinois.edu  (either CNAME record or separate zone)

Changes to CNAME records in the illinois.edu zone must be made by request to Hostmgr, but fourth-level zones will be made available for self-service management via the IPAM web interface (and may contain an arbitrary number of fifth-level records).

Consider placing records that don’t have specific name requirements (including e.g. dev/test records) underneath a single fourth-level zone.

This option provides somewhat more flexibility for web hosting solutions (since the target of the CNAME record is another domain name, which does not need to resolve to a static IP address).  It is also more lightweight, and therefore generally preferable for new subdomains which do not require a large number of fourth-level records.

Requirements for Third Level Domain Requests

The domain name must follow the Acceptable Name Guidelines and all policies outlined in this standard. The person or group making the request must have a university affiliation (registered organization, staff, faculty, student) and the request should be routed through the unit’s Network Admin.

Requested third-level domains must not already exist and must not be reserved for future use. Contact Hostmanager to check domain availability.

There is no charge for approved third-level subdomains of illinois.edu.

The domain request must include:

  • the desired domain name
  • a description of the name and purpose
  • contact information (considerations for hosted vs. delegated)
  • organization codes

See Requesting DNS Domains to start the domain registration request.

After approval, Technology Services will process the request and setup access to the domain through the IPAM web interface, or delegate it to the unit’s servers if requested (see below.) Domain requests will be acknowledged within one business day and processed within 5 business days.

Hosts and domains beyond the third level

Domain names beyond the third level are administered by the unit responsible for the third-level subdomain, subject to the following criteria:

  • The names follow the acceptable name guidelines
  • The length of any fully qualified domain name does not exceed 255 characters.

Note that separate DNS zones beyond the third level are usually not necessary unless the third level is registered as a CNAME or the fourth level requires delegation.  For example, you can use IPAM to create records named foo.bar.mysubdomain.illinois.edu inside a third-level zone mysubdomain.illinois.edu even though there is no fourth-level zone bar.mysubdomain.illinois.eduFrom the perspective of a DNS client, the end result is the same; the only practical difference is how things look when you log in to manage them in IPAM (i.e. whether you navigate into a separate Zone to look at all the “bar” records, or whether they are displayed in the third-level zone alongside everything else).

Implementation of changes / requests

  • Changes submitted via the IPAM appliance web interface will take effect immediately.
  • Requests emailed directly to Hostmanager will be hand processed as time allows. Upon completion, Hostmanager will send a completion email to the requestor. We ask that you give your request a full 24 hours for processing and activation.
  • Requests that have a sensitive time-line, either during regular business hours or outside of them, should be emailed to host manager and clearly communicated in the body of the email the desired time of activation. We ask that you coordinate all time sensitive requests a full 24 hours in advance.
  • Requests to modify TTLs
    The campus standard TTL is set at the domain level and inherited by all records of that domain. The campus standard is 1 hour. This duration can be lowered to help propagate changes to high profile machines (i.e Mail servers, Web servers, etc..) to external nameservers. TTL changes to individual records can be done by IT Professionals with appropriate access to the record in the IPAM appliance web interface; if a TTL change is needed for a record you do not have access to, please contact hostmgr.

Delegation of domains to unit-managed DNS servers

Units may request Technology Services to delegate management of the domain to unit-managed DNS servers. Delegated domains must follow other standards and practices in this document, but are served from unit-managed servers.

Definition of delegation

“Administrative responsibility over any zone may be divided, thereby creating additional zones. Authority is said to be delegated for a portion of the old space, usually in form of sub-domains, to another nameserver and administrative entity.”Wikipedia entry for DNS

Delegation is appropriate when the unit:

  • wishes to use its own tools and servers for managing its DNS records,
  • has business requirements that are not met by Technology Services DNS tools,
  • has technical integration requirements (such as Active Directory dynamic DNS)

What can be delegated?

  • unit third-level domains (e.g. unit.illinois.edu)
  • non-university domains (e.g. .org domains registered to the unit)
  • reverse IP lookup zones (PTR zones, e.g. 100.168.192.IN-ADDR.ARPA).
    • The DNS architecture requires having 256 address blocks for reverse lookup delegation. Units with less than a 256 address subnet cannot have reverse DNS delegated.

Delegation considerations

In a delegated DNS environment, the unit’s DNS servers are the primary responders to queries to delegated domains.

Because your DNS servers are the authoritative “holders” of your domain information, they should be well-managed and highly available.

Technology Services must have contact information on file for the DNS server administrators.

DNS outages often appear as full network outages, which harm the functionality and image of the university and your unit. The Internet takes DNS seriously and so do we.

DNS servers need to be in the Fully Open firewall group to provide DNS responses to off-campus requests.

Technology Services needs to know if you are using a Windows Active Directory domain controller as the DNS server.

Recommended values for DNS delegations

Technology Services recommends that nameservers for delegated zones be configured with the following values. Note that Technology Services does not prohibit DNS administrators from making other choices, so long as the configuration still complies with the official requirements of delegation (as set forth in the delegation agreement).

Recommended values

SOA values

  • Refresh: 1 hour. Exception: If departmental name servers cannot send NOTIFYs to Technology Services name servers, please contact hostmgr to determine an appropriate value.
  • Retry: 15 mins
  • Expiry: 2 to 4 weeks
  • Minimum: 15 mins

TIP: Don’t forget that when modifying a high-profile record (e.g. for a public-facing webserver) it is a good idea to reduce the individual record TTL in advance of making the change (e.g. to a value of 1-5 minutes), and to restore it afterward to the default setting.

Firewall groups for true Delegations

Departmental name servers for true delegations MUST be placed in the Fully Open firewall group to allow udp/53 and tcp/53 from any host (including off campus).

Firewall groups for primary/secondary pseudo-delegations

Any departmental name servers which advertise themselves in an NS RRset SHOULD allow udp/53 and tcp/53 from any host (including off campus).

“Hidden primary” departmental name servers which only participate in primary/secondary pseudo-delegations and are not listed in any NS records MAY allow udp/53 and tcp/53 traffic from off campus but are not required to do so.

Recursion

All departmental name servers must either disable recursion and use the campus resolver (IPv4:130.126.2.131) or restrict recursion to only known hosts.

Delegation request process

Send an email to hostmgr with the required information.

  • domains and zones to be delegated
  • DNS server names and IP addresses
  • Contact information for the zones
  • Reason for delegation

Domain lifecycle

Changes to domains

  • Domain removal
    If you no longer are in need of a domain associated to you, email Hostmanager. Once the requested date of removal is met, the domain will no longer resolve and (for non-.edu domains) billing will cease.
  • Transfers within the University
    If you no longer are in need of a domain and another department or unit would like to be associated with that domain, please contact Hostmanager. Hostmanager will coordinate between both departments to reach an agreement.

DNS technical considerations

Campus resolver IP address

The DNS resolver address for campus is 130.126.2.131.

IPAM Documentation

Welcome! This space (go.illinois.edu/ipam) contains detailed technical documentation for IT Professionals regarding the IP Address Management (IPAM) service.

Information for everyday computer users is available at Networking, DNS Basics.

Use the sidebar on the right to navigate.

Quick links:

What’s New

See IPAM News Blog for the latest news regarding the IPAM service.  Use the “subscribe” link at the bottom if you would like to receive notifications of new posts.

Contact Us

General questions or support requests regarding the IPAM service should be directed to Illinois IPAM Hostmgr at hostmgr@illinois.edu (pronounced “host manager”).

Documentation Overview

DNS Standards provides general information and guidelines about the use of DNS on campus.

Requesting DNS Domains explains how to obtain a new domain.

DHCP Standards provides general information and guidelines about the use of DHCP on campus.

Requesting DHCP for Networks explains how to enable autoconfiguration for your network, and provides a conceptual overview of the different behaviors.

Using IPAM explains how to manage DNS and DHCP configuration for your existing networks and authoritative zones using IPAM Grid Manager.

Other Tools contains related information which may be helpful to IPAM users.

Known Issues describes known problems or limitations of IPAM which may be relevant to IT Professional customers.

Requesting DNS Domains

Requesting New DNS Domains

Your group or organization is not limited to the domains that the University already has defined. We are able to host additional domains that fit the University mission, subject to the rules and requirements described in DNS Standards.

Use the Domain Request Form to request either an .edu subdomain (sample.illinois.edu or sample.uillinois.edu) or a new non-.edu domain (.org, .com, etc) for which you have a University-related need.

Naming Guidelines

Consult the Acceptable Name Guidelines to assist you in picking out names that conform to University policy.

To see if a non-.edu domain you want is available (prior to submitting your request), you can go to the Network Solutions home page and search for it.

Please do not attempt to actually purchase the domain from Network Solutions or any other domain granting institution. The University host manager must be involved in the requesting of the domain in order for our DNS servers to provide the service.

Transferring an Existing Domain

To transfer an existing non-.edu domain to University ownership from another registrar:

  1. Contact the domain owner, and ask them to unlock the domain for transfer and provide you with the transfer authorization code.
    • If the domain is close to expiration, also consider renewing it with the current registrar now to ensure it will not expire before the transfer completes.
  2. Once you have the code, complete the Domain Request Form.  Note that you will need to provide:
    • the transfer authorization code
    • is the domain currently in active use, or is a lengthy disruption in service acceptable?

      If the domain is in active use, we will work with you to perform a seamless migration which ensures that live DNS queries for the domain continue to resolve without interruption, and with consistent answers, at all times during the transfer process.

      If you indicate that a lengthy disruption in service is acceptable because nothing actively depends on this domain right now, we can follow a simpler process which involves less work for both you and us.

  3. For seamless migrations, Technology Services will work with you to import the domain’s current zone data into our nameservers, and then ask you to update the NS records with the current registrar.

    It is important to migrate all of your domain’s DNS records (not just the address record for your website) unless you are certain that you don’t need them anymore.

    Once you have provided the current zone data, do not make any further changes to your DNS records until we confirm that it is safe to do so.

  4. To process your order, an authorization email will then be sent to the the current Administrative Contact of Record (as identified by WHOIS). The Administrative Contact must authorize the transfer within 14 days of receipt of the email. Once our registrar receives this authorization, your request will be submitted to the registry to finalize the transfer.
  5. If for some reason your transfer fails, we will notify you and work with you to retry the transfer. Common reasons why registrars will reject a transfer include:
  • Domain name is within 60 days of initial registration
  • Domain name is within 60 days of a previous transfer
  • No response/negative response to transfer authorization request to current Administrative Contact of RecordIf the transfer still does not succeed after all reasonable efforts have been made, Technology Services will provide at least 7 days notice before removing the zone from our nameservers, to allow you time to update your NS records again.

Please note: the transfer process can take up to two weeks from the time we initiate the transfer.

For other questions about transfers, please email hostmgr.

Automatic Renewals

Non-.edu DNS domains registered through Technology Services are automatically renewed by the registrar 60-90 days before they are scheduled to expire.

The Primary and Administrative contacts listed for the domain in Contacts Database will receive a notification email prior to each auto-renewal, but will NOT need to respond affirmatively in order for the auto-renewal to proceed (this eliminates unnecessary workflow steps for you and for us, and reduces the risk that a domain registration will unintentionally be allowed to lapse).

If you no longer wish to renew a non-.edu domain, please inform hostmgr at least 91 DAYS PRIOR TO ITS EXPIRATION DATE (or sooner if that deadline would fall on a non-business day) to ensure that the change can be processed before the next auto-renewal occurs.  Choose one of the following options:

  • Disable renewal but keep the domain in service until it expires.
  • Deactivate the domain immediately.

Note that removal requests should come from a Primary contact if possible (otherwise we will attempt to reconfirm with a Primary contact).

By choosing to disable renewal but keep the domain in service, you accept full responsibility for any disruption that may occur when the domain expires.  You will NOT receive any further notification from Technology Services when this is about to happen.  As a best practice, we recommend leaving automatic renewal enabled until you are actually finished using the domain.

Q: For how many years at a time will a non-.edu domain be renewed?
A: Each domain will automatically renew for the same duration as its current term, i.e. a domain most recently purchased or renewed for 3 years will auto-renew for 3 years.  If you wish to adjust this cadence, you can contact hostmgr to request a one-time manual renewal for a new term of 1, 2, 3, or 5 years (which will immediately extend the current expiration date by that amount).

Q: Which CFOP will be billed for the renewal fee?
A: Each non-.edu domain has a CFOP on file which is billed $10 per year plus renewal fees equal to the amount that Technology Services pays the registrar (as specified in DNS Standards).  Contact hostmgr if you wish to change the CFOP to which your domain is billed.

Managing DNS for your Domains

Once your domain has been created, you can use IPAM to create and modify most types of DNS records; see Using IPAM for detailed instructions.

Other Information

DNS Basics (KB#47914) is written for a general audience, and briefly explains what a DNS server is used for and which IP addresses are used for the campus DNS servers.  Note that most users will not ever need to change their computers’ DNS settings.

DNS Standards contains information about implementation details related to the campus domain registration policy.

Virtual Alias Records

Introduction

A traditional CNAME record (see also Stand-alone CNAME Records) defines a static, explicit alias in the DNS, with the oft-lamented technical limitation that a CNAME record cannot be placed at the apex of a zone (e.g. example.com).

Virtual Alias records are a non-standard but increasingly common DNS feature specifically designed to work around that limitation while still accomplishing a similar goal.

When we configure a virtual A Alias record in IPAM, our authoritative nameservers periodically query other nameservers to find the current A record(s) of the desired target name (e.g. abc123.cloudfront.net), and synthesize corresponding A record(s) for the alias name (e.g. example.com).  The result is a dynamic, transparent alias:

  1. IPAM authoritative nameserver receives a query matching the virtual alias:  example.com. IN A?
  2. IPAM authoritative nameserver sends a query for the target name: abc123.cloudfront.net. IN A?

  3. IPAM authoritative nameserver receives this response for the target name:

    abc123.cloudfront.net. 60 IN A 198.51.100.17
    abc123.cloudfront.net. 60 IN A 198.51.100.18
  4. IPAM authoritative nameserver returns this synthesized response for the virtual alias name:

    example.com. 60 IN A 198.51.100.17
    example.com. 60 IN A 198.51.100.18

The intermediate response is cached according to its TTL (time-to-live) value, so any further identical queries received by the same IPAM authoritative nameserver within the next 60s will skip steps 2 and 3, and return the same synthesized records with a lower remaining TTL.  Each individual IPAM authoritative nameserver maintains its own independent cache.

When the external nameserver’s response for the target name changes, IPAM’s response for the virtual alias name will also change (once the old response expires from cache).

If no A records are found for the target name, then IPAM will return zero A records for the virtual alias name.

This virtual A Alias record is only used to answer A record queries, but we could additionally and independently configure a virtual AAAA Alias record to answer AAAA record queries.

Key differences vs CNAME records

  • A CNAME record affects query behavior for all record types, but each virtual Alias record applies to only one record type (e.g. only A records, or only AAAA records).  This enables virtual Alias records to coexist with records of other types, which is why they can be placed at a zone apex while a CNAME record cannot.
  • Virtual Alias records are transparent (invisible) to clients, ultimately yielding the same query response as an equivalent set of static records:

    example.com.  IN A  198.51.100.17
    example.com.  IN A  198.51.100.18

    whereas CNAME records are explicitly returned and must be interpreted by the client:

    www.example.com.        IN CNAME  abc123.cloudfront.net.
    abc123.cloudfront.net.  IN A      198.51.100.17
    abc123.cloudfront.net.  IN A      198.51.100.18

    In this case only the CNAME record comes from our IPAM authoritative nameserver; the client’s recursive resolver combines that with A records from some other authoritative nameserver to form the sample response shown.

Best practice: use a CNAME record if you can.  Use virtual Alias records when you need aliasing behavior but it’s not technically possible to use a CNAME record.  See also Limitations below.

Limitations

Virtual Alias records cannot coexist in IPAM with other records of the same type (i.e. you cannot define both a virtual A Alias and a stand-alone A record for the same name).  There is no “fallback” functionality.

Virtual Alias records can be difficult to troubleshoot, since the external behavior of their target names might change unpredictably. 

CloudFront in particular tends to return a wide variety of different answers for the same target name at any given moment (not just over time), so it is entirely reasonable and expected for each individual IPAM authoritative nameserver to return a different answer for the virtual alias name (each corresponding to the response that particular nameserver most recently got from CloudFront), and for none of those answers to match a separate test query for the CloudFront target name.

Virtual Alias records cannot be used in DNSSEC signed zones.

We don’t use DNSSEC signed zones as this time, but plan to do so in the future.

At this time, we are offering virtual Alias records only for the zone apex of a second-level non-.edu domain (e.g. example.com), not for .edu subdomains.

(Note however that third-level .edu subdomains can be registered as a third-level CNAME record in the illinois.edu zone instead.)

Configuring virtual Alias records

Unfortunately we are not able to offer self-service configuration of virtual Alias records within IPAM at this time.  Changes should be made by request to hostmgr; be sure to include

  • fully qualified domain name (FQDN) for the virtual alias
  • which record type(s) should be aliased
  • the target FQDN

Virtual Alias records vs DNS Traffic Control

Virtual Alias records and DNS Traffic Control both involve synthesized responses, but they are aimed at different use cases.

Consider using DNS Traffic Control if your service has a stable set of eligible target IP addresses, but some of them might be unhealthy from time to time.

Consider using a Virtual Alias record if your service has a stable target DNS name, but the set of IP addresses that name might resolve to is unpredictable (and it’s not possible to use a CNAME record).