Contents
Bookmarks
Grid Manager allows you to bookmark an object (zone, network, etc) and easily navigate back to it later. This is a good way to quickly access your most commonly used objects.
Adding bookmarks:
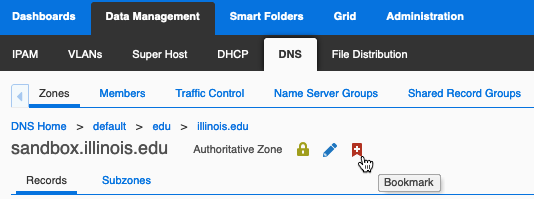
- Open the object you wish to bookmark, so its name or identifier is displayed near the top of the main window (see Getting Started with IPAM).
- Click the Bookmark (red swallowtail flag) icon to add a new bookmark for this object.
screenshot
Using bookmarks:
- Locate the Finder panel on the far left-hand side of the window; if it is currently collapsed, click the gray folder icon to expand it.

- Expand the “Bookmarks” subpanel.
screenshot

- Click on the name of a bookmark to immediately navigate to the object.
You can also hover over a bookmark and click the Edit (blue pencil) icon to change its name, or the Delete (trash can) icon to delete it.
Smart Folders
The following smart folders can provide you with quick, convenient access to your own domains and networks (the ones for which you are listed in Contacts Database), but they require a one-time set up for each user account.
Setting up the My Domains smart folder
- Navigate to Smart Folders > Global Smart Folders using the rows of tabs at the top of the screen.
- Select the global smart folder named “My Domains”.
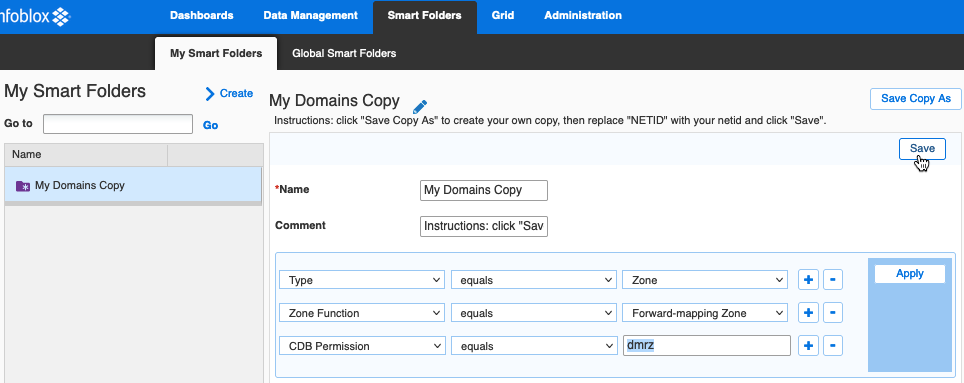
- Click “Save Copy As” to create your own personal copy of this smart folder named “My Domains Copy” under Smart Folders > My Smart Folders.
screenshot

- Click the Edit (blue pencil) icon to edit “My Domains Copy”.
- In the last filter criterion (CDB Permission equals NETID), replace “NETID” by your netid.
- Click the “Save” button (not “Save Copy As”) to save your changes.
screenshot
Setting up the My Networks smart folder
- Navigate to Smart Folders > Global Smart Folders using the rows of tabs at the top of the screen.
- Select the global smart folder named “My Networks”.
- Click “Save Copy As” to create your own personal copy of this smart folder named “My Networks Copy” under Smart Folders > My Smart Folders.
- Click the Edit (blue pencil) icon to edit “My Networks Copy”.
- In the last filter criterion (CDB Permission equals NETID), replace “NETID” by your netid.
- Click the “Save” button (not “Save Copy As”) to save your changes.
Using Smart Folders
- Locate the Finder panel on the far left-hand side of the window; if it is currently collapsed, click the gray folder icon to expand it.
- Expand the “Smart Folders” subpanel.
- Click the (+) icon to the left of a smart folder (e.g. My Domains or My Networks) to expand its contents within the Finder panel.
- For smart folders with grouped results (e.g. My Networks), click the (+) icon to the left of a result group (e.g. network name) to show the individual objects (e.g. network CIDRs).
screenshot

- Click on a domain name or a network CIDR to navigate directly to the corresponding Zone or Network object.
Using the Toolbar panel
The Toolbar panel on the right-hand side of the main window (just to the left of the Help panel) provides many convenient shortcuts for the experienced IPAM user.
For example, you can use the Toolbar’s Add menu to create DNS Records, DHCP Ranges, and even MAC Address Filter Items (MAC addresses within a MAC Address Filter) without having to first navigate to and open a particular Zone, Network, or MAC Filter object. If you know exactly what you want to add and where you want to put it, this can save a lot of clicks.
The Toolbar panel is available in most screens of the Grid Manager interface, but displays different choices depending on navigational context (e.g. which tabs are selected at the top of the window). If it is currently collapsed, click the gray toolbox icon to expand it.
![]()
User Profile
To open the User Profile dialog box, click the drop-down control labeled with your username in the upper right-hand corner of the interface, and select “Profile”.
- You can customize Table Size to increase the number of rows you see at a time in Grid Manager tables (up to 256).
Be aware that increasing the table size may result in slower UI performance; you may wish to experiment with different values to find a good balance. The default is 20.
- You can enter an Email Address which Grid Manager will use e.g. to send you an email when one of your Scheduled Tasks completes.
- You can choose a Time Zone (e.g. “America/Chicago”) for displaying various time values in Grid Manager, including your own Last Login time at the upper-right corner of this User Profile dialog (reopen the dialog to see the effect of this setting). The default is “Auto-detect time zone”, but in our experience that setting often ends up falling back to UTC.
Customizing Table Columns
Most tables in Grid Manager can be easily customized to display additional columns. For example, to add the Network Name column to the table that appears when browsing a list of Networks in DHCP View:
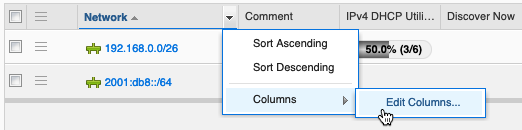
- Mouse over any currently displayed column header (e.g. “Network”), and click the downward arrow button that appears on its right side.
- Choose Columns > Edit Columns from the context menu.
screenshot
- Select the “Visible” checkbox for all desired columns (e.g. Network Name).
- Click the “Apply” button.
Additional columns you may find useful:
- Network Name (when displaying a list of Networks in DHCP View or IPAM View)
- MAC Address (when displaying the contents of a Network or Range)
- Property Tag (when displaying the contents of a Network or MAC Address Filter)
- TTL (when displaying Records in a Zone)
Scheduled Tasks
If you don’t want your changes to take effect immediately, you can schedule them to occur later at a time of your choosing. Important things to keep in mind:
- While a scheduled task is pending, no further changes can be made to the target object (by you or anyone else) until the task either completes or is cancelled.
- You can manage your own scheduled tasks, but you cannot manage scheduled tasks owned by another user.
- Always double check the Time Zone when choosing a time.
- When the IPAM appliance grid is upgraded to a new software release from the vendor, any Scheduled Tasks that have not completed before the upgrade begins will be automatically removed. The service team will do our best to inform you when this occurs, but please avoid scheduling tasks many months or years in the future.
Please be considerate of colleagues who manage the same networks and domains you do; avoid e.g. creating scheduled tasks just before you leave on vacation.
If you do find that a change you need to make is obstructed by a pending scheduled task, and you can’t get in touch with the task’s owner, you may contact hostmgr for assistance.
When adding a new object:
- Use “Next” to keep advancing through the dialog screens until you reach a choice between “Now” and “Later” (or click “Schedule for Later” to skip ahead to this screen).
- Choose “Later”, double-check the Time Zone, and enter the desired date and time.
- When you click “Save & Close”, your change will be scheduled for the selected time.
When editing an existing object:
- Click the blue calendar icon
 at the top right-hand corner of the dialog window to show scheduling options.
 - Choose “Later”, double-check the Time Zone, and enter the desired date and time.
- Optionally, you may collapse the scheduling options again (the calendar icon will turn green as a visual reminder).
- When you click “Save & Close”, your change will be saved and scheduled for the time you selected.
When deleting an existing object:
- Select the object in any table view (making sure no additional checkboxes are selected).
- Click the drop-down arrow next to the Delete (trash can) icon above the table, and choose “Schedule Delete” from the context menu.
- In the dialog box, choose “Delete Later”, double-check the Time Zone, enter the desired date and time, and click “Schedule Deletion”.
To manage your own scheduled tasks:
- Navigate to Administration > Workflow > Task Manager using the rows of tabs at the top of the screen.
- Your current scheduled tasks will be displayed with an Execution Status of “Pending”.
- From here you can:
- Mouse over the various fields for a pending task to show details of the change.
- Optionally click “Toggle multi-line view” (above the table) to see more without using mouseover. After you click it, the link text changes to “Toggle single-line view”.
- Select a pending task and “Execute Now”.
- Select a pending task and Reschedule it for a different time.
- Select a pending task and Delete it.
Extensible Attributes
Grid Manager supports the definition of custom fields called Extensible Attributes to store additional data which is not natively part of an object type. Technology Services has created a few Extensible Attributes that you may find useful:
- Property Tag: Can be used to store a University property tag value for inventoried items
- Comment+: The built-in comment field for Grid Manager objects is limited to 256 characters. If you want to store additional comments, you can use this attribute to do so.
You can set these attributes on the Extensible Attributes subscreen, while creating a new object or editing an existing one:
- Click the Add (+) icon above the Extensible Attributes table to place a new row in the table.
- Click the Attribute Name field in that row to choose the desired attribute.
- Click the Value field in that row and type the desired value.
- Some extensible attributes (e.g. “Comment+”) can have multiple values for the same object; use the “+” icon to the left of the attribute name to add another value.
screenshot

If you have a request for a new Extensible Attribute that is not already defined, please contact hostmgr. Keep in mind that Extensible Attribute definitions are global, so they should be potentially relevant (or at the very least, not confusing) to the entire IT Pro community.
Recycle Bin
If you delete an item by accident, you may be able to restore it using the Recycle Bin.
To view items in your Recycle Bin:
- Locate the Finder panel on the far left-hand side of the window; if it is currently collapsed, click the gray folder icon to expand it.
- Expand the “Recycle Bin” subpanel.
screenshot
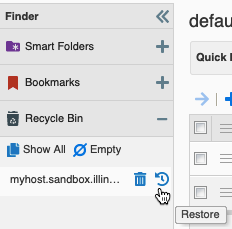
- To restore a deleted item, hover over the item in your list and click the “Restore” (circular arrow) icon.
Grid Manager does not display a confirmation dialog before restoring an object from the Recycle Bin!
It also does not show you the newly restored object; if you want to examine it, you must navigate to it on your own.
You can also click “Show All” to display a table showing slightly more information about each deleted item (including the Parent/Container where it will be found if you choose to restore it).
CSV Import and Export
Most tables in Grid Manager have an Export (up arrow) button which you can use to download the contents of the table in CSV format. This can be very helpful if you want to sort or filter your data in a way that the Grid Manager interface doesn’t support.
You can also import records into Grid Manager from a .csv file.
See CSV Imports and Exports for details.