Contents
Introduction
A Host record allows a single primary Name (fully-qualified domain name) to be associated with any of the following, managed collectively in Grid Manager as a single database object:
- one or more IPv4 addresses, which manifest as matching pairs of A and PTR records
- one or more IPv6 addresses, which manifest as matching pairs of AAAA and PTR records
- one or more Host Aliases, which manifest as CNAME records pointing to the primary name
- optional DHCP fixed address configuration for each IP address
Note that publishing multiple A records for the same name (by adding more than one IPv4 address to a Host) or multiple AAAA records for the same name (by adding more than one IPv6 address to a Host) is legal and results in “round-robin DNS” behavior.
Host records provide several advantages compared to managing an equivalent collection of Stand-alone DNS Records, the most important of which is that if you change one part of a Host record, the other parts will automatically update to stay in sync.
The trade-off is that you must be VERY careful when deleting a Host record!
- In general, use Host records instead of stand-alone A, AAAA, and PTR records.
- Exception: use stand-alone records when you do not want matching pairs (e.g. because the corresponding reverse-mapping DNS is not managed in IPAM).
- Do not create multiple Host records for the same IP address.
- Use stand-alone CNAME records instead of Host Aliases if the desired alias name resides in a different zone (from the primary name) which is not managed by the same set of people, or in general depending on your preference.
- In general, use DHCP-enabled Host records instead of DHCP Fixed Addresses.
For more information, see When should I use stand-alone A records? and When should I use stand-alone CNAME records?
Managing a Host record requires DNS Requests permission on all relevant domains (for primary name and Host Aliases) and all relevant networks (for IPv4 and IPv6 addresses).
Creating a Host record
To create a new Host record:
- Open the DNS Zone which will contain the desired primary name. (alternative: open a Network in IPAM View and select the desired IP address). Opening Zones and Networks is described in Getting Started with IPAM.
- Click the dropdown arrow next to the Add (+) icon above the table in the main workspace, then choose “Host”, and finally “Host” again.
screenshot

This opens the Add Host dialog box. (alternative: in IPAM View click Add, then “Host”, then “New Host”)
- If necessary, click the “Select Zone” button and choose the zone which will contain the desired primary name (e.g. to create “myhost.sandbox.illinois.edu”, you would select the zone “sandbox.illinois.edu”).
If you opened a DNS zone in the main workspace, it will be automatically pre-selected for you.
- Type the leading portion of the Name (e.g. “
myhost“) into the text box to the left of the selected zone name, so that both pieces together form the desired fully-qualified domain name.screenshot
- You may leave the text box empty to create a record with the same name as the zone itself (e.g. “sandbox.illinois.edu”).
- You may type e.g. “
foo.bar” in the text box to create a record named “foo.bar.sandbox.illinois.edu” even if there is no zone “bar.sandbox.illinois.edu”.
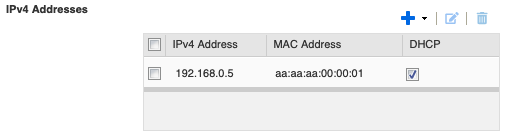
- If desired, add one or more IPv4 Addresses to your Host: click the drop-down arrow next to the Add (+) icon just above the IPv4 Addresses table and choose “Add Address” to place a new row in the table, then click the IPv4 Address field in that row and type the desired IPv4 address. Press return or click elsewhere when you are done typing.
screenshot

If you opened a Network and selected an IPv4 address in the main workspace, it will be automatically pre-populated for you.
- If desired, add one or more IPv6 Addresses to your Host.
screenshot

- Add a comment in the “Comment” field (optional).
- Click “Next” at the bottom of the dialog window.
- If desired, add one or more Extensible Attributes (e.g. “Property Tag”).
- Click “Next”.
- If desired, you may schedule this change to occur at a later time instead of taking effect immediately (see Scheduled Tasks).
- Click “Save & Close” at the bottom of the dialog window.
Editing a Host Record
Before changing the primary Name of a Host record, it is advisable to perform a Basic Search by DNS Name for the current primary Name (fully-qualified domain name), in order to identify any Stand-alone DNS Records (CNAME, MX, etc) pointing to it.
- Navigate to the Host record you want to edit (see Getting Started with IPAM); you can find it either by name or by IP.
- Select the checkbox for the Host record and click the Edit (notepad) icon above the table.
screenshot
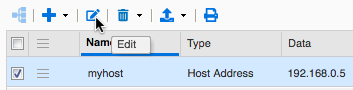
This opens the Edit Host dialog.
- Make any desired changes (several possibilities are discussed below).
- Click “Save & Close” at the bottom of the dialog window.
Adjusting TTL
For changes to high-profile DNS records (e.g. migrating a live production service), Technology Services recommends that you temporarily lower the TTL of the record in question (e.g. to 1 minute) at least one hour prior to making the actual change, and then restore the TTL to the campus default (1 hour) after the change is complete and you have confirmed that everything is working properly.
To set a custom TTL for a Host record:
- Choose the “TTL” subscreen in the Edit dialog.
- Click “Override” next to the TTL value, and enter the new desired value (e.g. 1 Minute).
screenshot

- Click “Save & Close”.
When your high-profile change is complete, Edit the record again and click “Inherit” on the same TTL subscreen to resume using the campus default.

Adding Host Aliases
A Host Alias is functionally equivalent to a stand-alone CNAME record which points to the Host’s primary Name, but carries trade-offs with respect to ease of future maintenance. For more information, see When should I use stand-alone CNAME records?
To add a Host Alias to a Host Record:
- Choose the “Aliases” subscreen in the Edit dialog
- Click the Add (+) icon to place a new row in the table, then click the Aliases field in that row and type the new fully-qualified domain name that should point to this Host. Press return or click elsewhere when you are done typing.
screenshot

- Click “Save & Close”.
Enabling DHCP for Host addresses
Enabling DHCP within a Host record is functionally equivalent to creating a stand-alone DHCP Fixed Address, but makes it easy to keep the DNS and DHCP configuration for a client in sync (in case you later decide to migrate the same client to a different IP address or retire it altogether).
To enable DHCP for an IP address in a Host record (either while adding a new Host record or while editing an existing one):
- Click the DHCP checkbox to the right of the desired IP address.
- For IPv4 addresses: click the “MAC Address” field in that row and type the MAC address of the client that will use this IP. Press return or click elsewhere when you are done typing.
Click here to expand…
- For IPv6 addresses: do not use the “MAC Address” field as this option is not yet supported by most building routers on our campus. Instead, click the “DUID” field in that row and type the DHCP Unique Identifier of the client that will use this IP (see also Limitations of DHCPv6 fixed address allocation). Press return or click elsewhere when you are done typing.
- Optionally, you can also select the IP address using the checkbox to its left and then click the Edit (notepad) icon above the table to configure custom DHCP options that will apply only to this individual fixed address (but are otherwise similar to Setting DHCP Options for a Range). Hint: don’t forget to enable Advanced Mode for the sub-dialog.
- Click “Save & Close”.
Please note that your network must have autoconfiguration service appropriately enabled (see Requesting DHCP for Networks) in order for enabling DHCP within a Host record to have any effect.
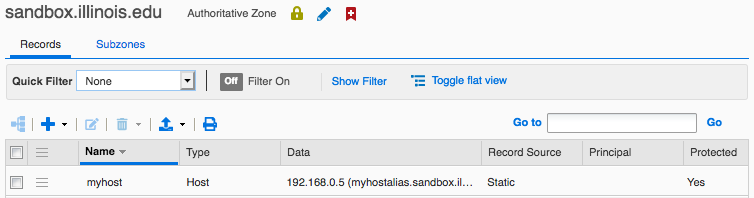
Displaying Host records in a Zone
When displaying Records within a Zone (see Getting Started with IPAM), we recommend that you click “Toggle flat view” so that each manifestation of a Host record is displayed in its own table row. After you click it, the link text changes to “Toggle hierarchical view”. It should look like this:

If you instead choose to display Records in hierarchical view, the Host record will appear only as a single row for the primary Name, and any Host Aliases in other zones will not be visible at all when displaying the contents of those zones. This view is not recommended, as it may cause you to overlook important data.