This page contains information about navigating the Grid Manager web interface once you have logged in.
Contents
Logging In
See How do I log in?
Getting Help
If you have a question not covered by this service documentation, you can try one of the following resources or contact hostmgr for assistance.
Help Panel
All screens and dialog windows in Grid Manager contain context-sensitive help, which appears in the Help panel on the far right-hand side of the window.
- If the Help panel is not visible, click the grey “?” icon on the far right to expand it.

- Some Help panels contain vertically expanding subpanels. Expand the subpanel labeled “Help” to see context-sensitive help for the screen you are on.
- When you don’t need the Help panel, you can collapse it again to save space.
Vendor Documentation
Extensive vendor documentation for Grid Manager is published in HTML and PDF formats.
Please note that not all functionality described in the vendor documentation is available to you in the University of Illinois IPAM service.
Browser Information
The vendor documentation includes requirements for your workstation (including minimum display resolution) and known limitations for certain browsers.
A few general tips:
- Please be patient with the web interface; occasionally it will take a few seconds to finish refreshing after you have clicked on something. Clicking repeatedly will not help, and in fact will probably make you wait longer for the interface to catch up.
- Don’t use your browser’s Back button within Grid Manager.
- Don’t use Grid Manager in multiple tabs or windows of the same browser, as they may interfere with each other.
(However, we have had success using Grid Manager concurrently in two separate browsers, e.g. in one instance of Chrome and one instance of Firefox.)
The list of OS and browser versions tested and validated by the vendor is now maintained in the release notes (which are not publicly viewable), but generally includes recent releases of Firefox, Chrome, Safari, and Edge. Let us know if you consistently experience problems with the latest version of any of these browsers, and also whether the problem is solved by using a different browser. Note that Mozilla offers a Firefox Extended Support Release (ESR) which may be helpful in some circumstances.
If this is your first time using IPAM, we encourage you to actually log in now and follow along with this tutorial.
Upon first login, Grid Manager will display the (fairly sparse) Tasks Dashboard, which doesn’t do much but serves as a landing page.
To illustrate some basic principles of Grid Manager navigation, we’ll begin by browsing Networks in DHCP View. This is not what you’ll usually do in practice, but it’s the simplest place to start.
Browsing Networks in DHCP View
To display Networks in DHCP View:
- Choose “Data Management” from the top row of tabs.
- Choose “DHCP” from the second row.
- Choose “Networks” from the third row.
- Choose “Networks” from the fourth row.
This will display a table containing all Networks that you have permissions on.

Unfortunately the Network Name column is not displayed by default, but you can easily add it to the table; see Customizing Table Columns.
Using the Table Controls
Just above the table in the main workspace is a row of icon buttons. Mouse over each icon in turn to see their names:
Open, Add, Edit, Delete, Export, and Print.
![]()
-
To Edit a Network from the table, select the checkbox to its left, and then click the Edit (notepad) icon above the table.
screenshot
This opens the Edit Network dialog box. You don’t have permissions to change anything in the Edit Network dialog box, but you can use it to examine the DHCP configuration properties of your Network. To close the dialog box and return to the table, click Cancel (in the lower left).
- To Open a Network from the table, just click directly on its address/CIDR (e.g. “192.168.0.0/26”) in the Network column. Alternatively, you could select its checkbox and then click the Open (right arrow) icon above the table. Opening a Network takes you to a new screen which we will discuss in the next section.
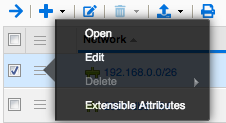
The hamburger menu icon in each table row displays a shortcut menu which provides yet another way to Open or Edit the Network in that row.
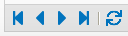
If your table contains too many rows to display all at once, you can
-
use the page navigation buttons (below the table, on the left) to page through them.
-
start typing the first several characters of a network address e.g. “192” into the “Go to” box (above the table, on the right) to quickly select a matching row.
“Go to” only matches one field (whichever one Grid Manager considers to be the primary identifier), so you can’t use it to find e.g. Network Name even if you have added a Network Name column to the table. -
click “Show Filter” and Apply desired filter criteria to display fewer results. (Note that you can Filter based on Network Name.)
screenshot
Opening a Network (DHCP View)
When you Open a Network as described above, the main workspace displays a new table containing all DHCP-related objects (Fixed Addresses, Ranges, and DHCP-enabled Hosts) that have been configured within that Network.

From here you could go on to perform a variety of DHCP configuration tasks.
For now, just familiarize yourself with the following new interface elements near the top of the main workspace:
- The breadcrumb link “Networks Home” (just below the four rows of navigation tabs) may be used to return to the list of all Networks.
- Next, Grid Manager displays the currently opened object (“192.168.0.0/26”) and its type (“IPv4 Network”).
-
Click the nearby blue pencil Edit icon
 to Edit the currently opened object.Note the difference between this blue pencil Edit icon which edits the currently opened object, and the notepad Edit icon
  further down which edits the object whose checkbox is selected from the table.
 - Click the Bookmark (red swallowtail flag) icon to bookmark the currently opened object so you can quickly navigate back to it later (see Advanced Tips and Tricks).
- Click “Go to IPAM View” to Open the current Network in IPAM View (discussed further down) instead of DHCP View. This is a convenient way to quickly switch between these two views of the same Network.
Opening a Zone
When you open a DNS Zone object as described above, the main workspace displays a table containing either the Records or the Subzones within that Zone (depending on which tab you select from the fourth row underneath the Zone name).

Note the following controls near the top of the main workspace:
- Multiple breadcrumb links allow quick navigation to any ancestor of the current zone, including the DNS View (“default”). “DNS Home” may be used to return to the list of Views.
-
Click “Toggle flat view” on the Records tab to change the way Host records are displayed in this table. After you click it, the link text changes to “Toggle hierarchical view”.
We recommend using Flat view for the Records tab, to ensure that you will always see all manifestations of Host records.
- Optionally (and independently), click “Toggle flat view” on the Subzones tab to display all descendants of the current zone instead of only its immediate children (note that this may cause the interface to respond more slowly). Navigate back up to “edu” for a clear illustration of the difference.
Browsing Networks in IPAM View
IPAM View is another way of looking at Networks. Whereas DHCP View is narrowly focused on DHCP functionality, IPAM View combines configuration data from both DNS and DHCP into a holistic picture of how every IP address in a network is being used (or not – it also displays unused IPv4 addresses). IPAM View also shows Network Containers which organize Networks into a hierarchical tree structure.
To browse Networks and Network Containers in IPAM View (again, this is intentionally not the quickest method):
- Choose “Data Management” from the top row of tabs.
-
Choose “IPAM” from the second row.
-
The main workspace will display any top-level Network Containers (shown with a folder icon) which contain at least one Network that you have permissions on. Note that you don’t have permissions on the Network Container itself, so you can’t see any other details about it.
screenshot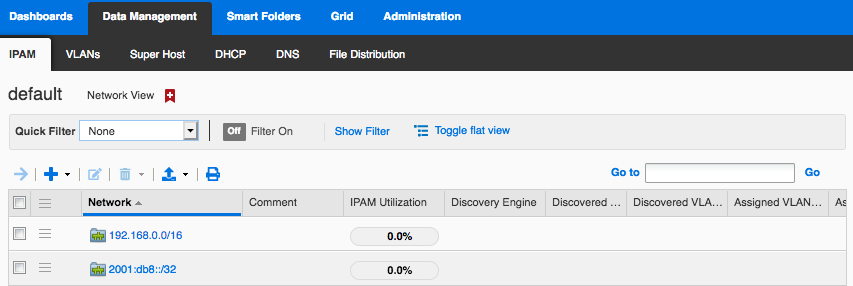
This is a separate table from the one we saw earlier in DHCP View, so you’ll want to add the Network Name column again here.
-
Open a Network Container by clicking its address/CIDR. At this point a third row of tabs appears with “Net Map” selected by default, and the workspace displays a graphical visualization of the contents of this Network Container (which may include other Network Containers and/or leaf Networks), subject to your permissions.
-
Choose “List” from the third row of tabs to display the contents of this Network Container in a table instead.
screenshot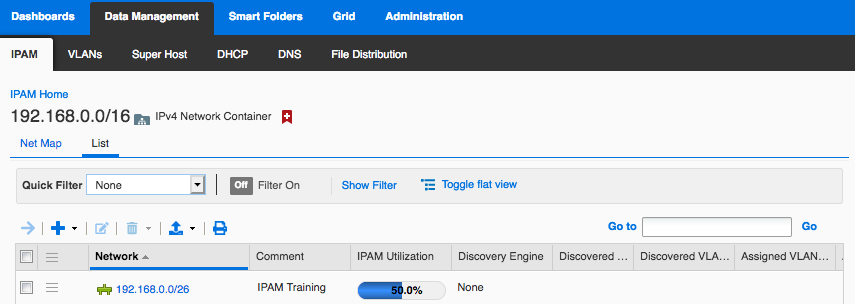
Note that Network Containers have a folder icon, while leaf Networks have an icon with no folder. There is also a “Toggle flat view” link which behaves similarly to the one described above for DNS Subzones.
- Open a leaf Network by clicking its address/CIDR.
Opening a Network (IPAM View)
When you open a leaf Network in IPAM View, you can choose “IP Map” from the third row of tabs to display a graphical representation of how each address in the network is used, or choose “List” to display the addresses in a table (generally more useful).
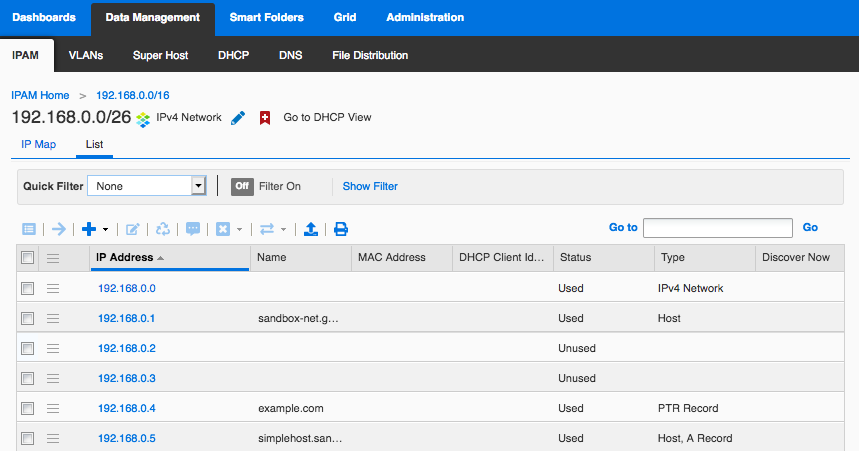
From here,
-
Click “Go to DHCP View” to open the current Network in DHCP View (instead of IPAM View). This is a convenient way to quickly switch between these two views of the same Network.
In general IPAM View is more powerful, but some DHCP configuration tasks can only be performed (and others are easier) in DHCP View.
- If you select an IP address which is used by only one object, you can click the Edit (notepad) icon above the table to Edit that object.
-
Open an IP address (by clicking on it in the table) to display all of its Related Objects in a new table where you can Edit or Delete them individually. Use the breadcrumb links to return.
screenshot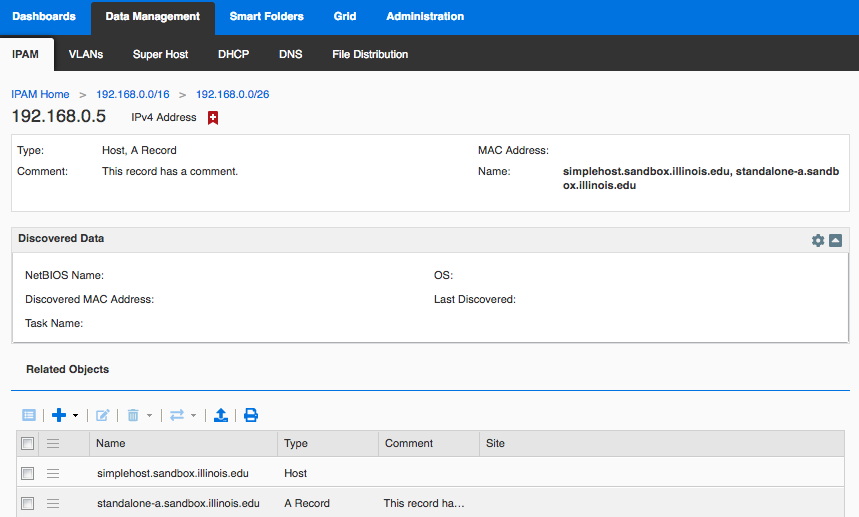
- Be very careful with the Reclaim button (see Reclaiming Objects Associated with IPv4 and IPv6 Addresses in the vendor documentation). When in doubt, it’s safer to examine the Related Objects individually and make a decision about whether to edit or delete each one.
- Please do not use the Ping button (see known issues involving Discovered Data).
Global Search
See also known issues involving Search.
The step-by-step browsing methods above are very helpful for learning how Grid Manager works, but they aren’t usually the quickest way to reach your goal. Grid Manager provides several practical navigation shortcuts, the most important of which is Global Search. (Some others will be discussed later in Advanced Tips and Tricks.)
Click the Search (magnifying glass) button in the upper right-hand corner of the interface window to open the Search dialog box.![]()
Use Basic Search to quickly locate objects matching a specific IP address, MAC address, or DNS Name:
-
Select the “Basic” tab.
- Click the left-most drop-down (“Choose Filter”) and select DNS Name, IP Address, or MAC Address.
- Optionally select a different operator from the middle drop-down.
-
Type the desired search value in the text box on the right.
Please note:-
MAC Address values should be punctuated with colons, e.g. “
aa:aa:aa:00:00:10“ -
When searching by DNS Name, try to use at least a partially-qualified name. For example, searching for “
www.techservices” is much more efficient than searching for “www“.
-
- Click “Search”.
(see screenshot under examples below)
or use Advanced Search for other types of searches:
- Select the “Advanced” tab.
-
In the first filter criterion (Type equals All), click the right-most drop-down (All) to select what type of objects you want the search to return, such as “All Networks” or “All Zones”.
If you do not filter by Type, then by default Grid Manager will search ALL objects in its database. While you might need to do this on rare occasions (if you aren’t able to find what you want using a more specific search), it takes a lot longer, and is also more likely to return a large number of uninteresting results.
- Type your desired search value into the main (unlabeled) text box above the filter criteria. You can enter a regular expression in this field; see Supported Expressions for Search Parameters in the vendor documentation for details.
-
Check “Include Extensible Attributes Values” in case the value you are searching for appears in an extensible attribute (such as Network Name). If you leave this unchecked, only built-in object fields will be searched.
- Optionally click “+” to add more filter criteria.
- Click “Search”.
(see screenshot under examples below)
Once your search results are displayed, you may: