This page contains information about configuring DHCP Ranges (Dynamic Pools) and DHCP options.
Contents
Introduction
A DHCP Range provides a pool of IP addresses that can be assigned interchangeably to any eligible DHCP client.
To configure an individual IP address for use exclusively by a single DHCP client, see DHCP Fixed Addresses or Adding DHCP to a Host Record.
The instructions below assume that you are working in DHCP View (see Getting Started with IPAM). Some DHCP configuration tasks can also be performed from IPAM View, but the exact sequence of steps may differ.
Creating A New IPv4 DHCP Range
To create a new DHCP Range:
- Open the Network in which you want to add a new range (see Getting Started with IPAM).
- Click the dropdown arrow next to the Add (+) icon above the table in the main workspace, then choose “Range”.
- Click “Next” at the bottom of the dialog window.
-
Enter the desired Start (first) and End (last) IP addresses for the range.
Make sure the range will be large enough to comply with Range Size Guidelines.
- Optionally enter an internal display name and/or a comment.
-
Click “Next”.
-
Important: for “Served by”, choose “IPv4 DHCP Failover Association” and then click the “Select Association” button to automatically select “DHCP-A” which is the only failover association available.

Do NOT select “Grid Member”. Although a DHCP Range served by a single Grid Member may appear at first glance to function correctly, this configuration is unsupported because it does not properly utilize the redundancy provided by DHCP Failover.
- Click “Save & Close” at the bottom of the dialog window.
Editing a Range
To edit an existing Range:
- Navigate to the Range you want to edit (e.g. by opening its Network in DHCP View, see Getting Started with IPAM).
- Select the checkbox for the Range object and click the Edit (notepad) icon above the table. This opens the Edit dialog box.
- Be sure to enable Advanced Mode for the dialog.
- Make any desired changes (see subsections below).
- Click “Save & Close”.
Setting DHCP Options
See DHCP Standards for the option values that will automatically apply unless you choose to override them.
To configure additional DHCP options:
- Choose the “IPv4 DHCP Options” subscreen in the Edit dialog.
- Scroll down to the “Custom DHCP Options” section at the bottom.
- Add your new option in the last row:

- First field:
- Choose a custom vendor option space if you wish to set a vendor-specific option which will be automatically encapsulated inside option 43 (see RFC 2132 Section 8.4) when replying to clients with the appropriate vendor class identifier (option 60).
- Otherwise, choose “DHCP” to set a standard DHCP option.
-
Second field: choose which option to set. Option names are not standardized and may vary by implementation, so check the numeric option code (displayed in parentheses) to be sure you have the right one.
If you need to set a custom DHCP option or vendor-specific option that is not yet defined in Grid Manager (i.e. does not appear in the drop-down lists), please contact hostmgr@illinois.edu. - Third field: type the desired value. The format of this value depends on the type defined for the option; see DHCP Option Data Types in the vendor documentation.
- First field:
- To add another option, click the + button.
To configure BOOTP/PXE settings:
-
Choose the “IPv4 BOOTP/PXE” subscreen in the Edit dialog (requires Advanced Mode).
Click the Override button next to the setting you wish to override, and enter a new value.Hint: most PXE clients require values for Next Server and Boot File (which respectively populate the “siaddr” and “file” protocol fields defined by RFC 2131); please note that these settings are not the same thing as options 66 and 67. Clients utilizing the Boot Server (“sname” protocol field) setting are much less common in our experience.
If you need to enter a value that contains backslash characters, they should be doubled, e.g. foo\\bar instead of foo\bar.
Exclusion Ranges
To exclude certain addresses within a DHCP Range from being dynamically assigned to clients:
- Choose the “Exclusion Ranges” subscreen in the Edit dialog (requires Advanced Mode).
- To add a new exclusion range:
- Click the Add (+) icon above the table to create a new row.
- Click the empty “Start Address” field in the new table row that appears, and type the first address to be excluded.
- Click the “End Address” field and type the last address in the range to be excluded. To exclude only a single IP address, enter the same value for Start Address and End Address.
- To remove an exclusion range:
- Select the checkbox to the left of the exclusion range to be deleted.
- Click the Delete (trash can) icon above the table.
Email Alerts
By default, the DHCP servers will automatically alert you by email whenever the current utilization of one of your DHCP Ranges exceeds 95% (and again when it drops back below 85%), with a maximum of one email alert per Range per day. The recipient list for these emails is automatically populated (at the Network level) based on the network contacts listed in Contacts Database.
You may wish to add the following addresses to your email address book and/or safe senders list to ensure that DHCP utilization warnings are not filtered as spam:
no-reply@dhcp-a1.techservices.illinois.eduno-reply@dhcp-a2.techservices.illinois.edu
From: <no-reply@dhcp-a1.techservices.illinois.edu>
Subject: DHCP high threshold crossed:

Message: DHCP high threshold crossed:
  Member: 192.17.2.10
  Network: 172.21.195.0/28/default
  Range: 172.21.195.7/172.21.195.14///default
  High Trigger Mark: 95%
  High Reset Mark: 85%
  Current Usage: 100%
  Active Leases: 5
  Available Leases: 0
  Total Addresses: 5

Reporting: DHCP
Node: 192.17.2.10
Time: Mon Mar  7 15:01:49 2018


Network Name: 0210-citesdhcp-net

Utilization graphs:
https://ipam-tools.techservices.illinois.edu/dhcpmon/view.fcgi?subnet=0210-citesdhcp-net

Help: https://netwiki.techservices.illinois.edu/public/home/ipamdocs/using-ipam/dhcp-ranges-dynamic-pools/#Email_Alerts
You can customize the behavior of Email Alerts for this Range by choosing the “IPv4 DHCP Thresholds” subscreen in the Edit dialog (requires Advanced Mode).
-
To adjust the threshold values (or disable notifications altogether) for this Range, click the Override button for the “DHCP Thresholds” area.
-
Be sure to check both “Enable DHCP Thresholds” and “Enable Email Warnings” if you do still want to receive notifications. Do NOT check “Enable SNMP Warnings”.
screenshot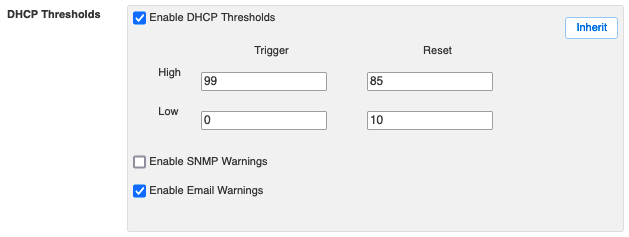
-
Note that actual utilization must be strictly greater than the High Trigger Mark (or strictly less than the Low Trigger Mark) in order to trigger an alert.
Hint: do NOT set High Trigger Mark to 100. If you only want notifications when the range is completely full, set High Trigger Mark to 99.
-
- To manually specify the list of email addresses which will receive threshold alert notifications for this Range (overriding the default recipient list for the Network), click the Override button for the “Email Addresses” area and populate the table as desired.
- To return either area to its default behavior, click the corresponding “Inherit” button.
Restricting Access to a Range
By default, IP addresses in a DHCP Range can be dynamically allocated to any client machine that is connected to the appropriate network. To restrict the use of a DHCP Range to specific clients:
-
Create a new MAC Address Filter and populate it with the desired MAC addresses (see MAC Address Filters), OR identify a suitable existing MAC Address Filter.
You can use the same MAC Address Filter to restrict access to multiple DHCP Ranges. - Choose the “Filters” subscreen in the Edit dialog for the Range (requires Advanced Mode).
- Click the Add (+) icon for the Class Filter List table, and select your MAC Address Filter.
- By default the filter will be added with Action “Grant Lease”, meaning that clients matching this MAC Address Filter will be permitted (and clients not matching any MAC Address Filter listed in the Class Filter List will be denied).
- If instead you want to deny leases to MACs matching this filter, click on “Grant Lease” and it will become a drop-down, then choose “Deny Lease” instead.
To return to the default behavior of permitting all clients, simply remove all Filters from the Class Filter List.
Advanced note: some use cases may involve adding an IPv4 Option Filter to the Class Filter List instead. If a Class Filter List contains more than one type of filter (e.g. one or more MAC Address Filters AND one or more IPv4 Option Filters), then clients will be checked against the criteria for each filter type separately, and must satisfy them all in order to receive a lease.
Using Multiple DHCP Ranges
Best practice: avoid using more than one DHCP Range on the same network, unless each is intended for a different (non-overlapping) set of clients.
In most cases, you will want to create only one DHCP Range per network. If your network has a discontinuous collection of IP addresses which should be assigned interchangeably, it is better to create one large DHCP Range with Exclusions then to create several small DHCP Ranges which are otherwise identical, because Email Alerts apply individually to each Range.
It may make sense to create multiple DHCP Ranges if each one is intended to be used by a different (non-overlapping) set of clients. If this is your goal, make sure that you associate at least one Filter with each Range.
Hint: if you configure one DHCP Range with action “Grant Lease” for a particular Filter, and a second DHCP Range with action “Deny Lease” for the same Filter, then any clients matching that Filter will be placed in the first range and all other clients will be placed in the second range.
Placing Fixed Addresses inside a DHCP Range
Best practice: avoid placing Fixed Addresses (or DHCP-enabled Hosts) inside a DHCP Range.
If you configure a Fixed Address (or DHCP-enabled Host) for an IP address that resides within a DHCP Range, it will function correctly (i.e. the IP in question will not be allocated to any other client). However, the fixed address will be counted in the utilization statistics for the DHCP Range, which can be confusing and misleading – especially in the context of Email Alerts.
The simplest way to avoid confusion is to separate the IP addresses used for dynamic vs fixed allocations so they don’t overlap, but this may not be feasible if your net is full of legacy devices that can’t be easily moved. In that scenario, your choices include:
- Configure Exclusion Ranges for all IPs used by fixed addresses, so that they will not be counted as part of the Range. This works well, but increases complexity (if you ever remove the fixed address, you must also remember to remove the exclusion before the IP will become dynamically assignable again).
- Accept that your utilization statistics will be inaccurate, and consider adjusting Email Alert thresholds for a better practical outcome (e.g. if utilization currently hovers between 95-99%, increase High Trigger Mark to 99 so that you’ll still receive a notification if it ever hits 100%).
- Decide that email alerts on this Range aren’t worth the trouble, and disable them. (But be careful: this means new dynamic clients will just silently fail to get a lease if none is available, and you won’t have any indication why).
Reserved Ranges
If you set “Served by” to “None (Reserved Range)” instead of “IPv4 DHCP Failover Association”, then your range will be a Reserved Range rather than a DHCP Range.
Reserved Ranges provide no DHCP functionality; they are simply a way to label a group of addresses within the IPAM system (with the additional proviso that Reserved Ranges and DHCP Ranges can never overlap). See vendor documentation for more information about Reserved Ranges.
Note that addresses within Reserved Ranges will be counted (along with DHCP Ranges) in the DHCP Utilization statistics for the entire net, which can be confusing. Workaround: Edit the Reserved Range and check “Disable for DHCP”.